Following Christopher LeCoq’s tips can turn your outdoor moment of a lifetime into a treasured memory that you can share for a lifetime.
Christopher LeCoq is a wizard behind the lens.
While most of his work is videography and production, his still images are equally amazing. He’s shot and produced several Louisiana hunting and fishing shows for many years. He’s also a regular in LSU sports productions. LeCoq has won numerous awards in broadcast media and even received a Suncoast Regional Emmy Nomination. He is regularly recognized by his peers from within the industry — even those not in tune with hunting and fishing.
He knows his stuff. The Louisiana Sportsman recently picked his brain to get tips for hunters and fisherman that want to take and produce high quality photos and videos to preserve and share their adventures in the outdoors.
“It is a lot easier these days,” he said. “Virtually everyone carries a smartphone so they always have a great tool to get high-resolution photos and videos right in their pocket. Gone are the days of needing a $5,000.00 camera to get stunning content. GoPro’s and smartphones fill the need for most. Other specific video equipment is constantly getting better, easier and less expensive.”
LeCoq regularly gets compliments on his work and they usually go something like this: “Your images are always awesome, that camera is so good.”
His answer and advice is, “Become familiar with the basics of image composition. Basic photography and videography lessons teach terms like headroom, rule of thirds, leading lines, negative space, diagonals, depth of field patterns and symmetry. This may all seem pretty technical, but are all simple concepts to understand. We have a psychological reaction to seeing an image. Knowing what makes it ‘pleasing to the eye’ greatly improves the quality of your work, no matter if you are using a cell phone, action cam, drone, consumer or professional camera. Strive to be creative and look at, and document things from unique perspectives and angles.”

Tips from the wizard
TIP 1: Don’t set out to be Steven Spielberg. Stay creative. Are you documenting this for personal memories or the general public? Keep your audience in mind and give them something they want to see.
TIP 2: Practice with your equipment to get familiar with all functions. Before going on an actual trip, photograph the kids and dog in the yard. Outdoor activities aren’t scripted and you need to prepare and be able to quickly adapt for when that special moment comes. Filming from a kayak or deer stand produces many more challenges that have to be met.
TIP 3: Before investing, you may want to rent a drone or GoPro to see if it is something you want to buy. Combining video from several different sources can make for a better production. If considering a drone, keep in mind there are strict restrictions on where they can legally be used.
TIP 4: Make sure to have several ways to attach your camera(s). This is especially important if self-filming. It is hard to hold a rod or gun and a camera all at the same time. You also do not want your video to all be from the same angle. Change positions several times. If you have more than one camera, all-the-better. Different perspectives can be edited in production and give the viewer a better experience.
TIP 5: Editing is the most time consuming part of final production. Don’t just turn the camera on and let it run all day. Know what you
want and be specific in your filming. That provides much less footage to have to review for editing. YouTube is a great resource to learn the technical side of production. Watch and learn. It is also a good source to get equipment comparisons and help make informed choices before you purchase.
TIP 6: Managing data takes some planning. Today’s cameras are much higher resolution and therefore the files are larger and require more storage space. Always save files from your memory cards to multiple locations to have back-ups in case one copy gets damaged or accidentally deleted. Cloud-based storage and external hard drives keep your data safe and also free up your computer’s memory for editing purposes.
TIP 7: Keep in mind that not every outing will work out as planned. Don’t frustrate yourself if things are not working out. You cannot control the weather, the fish, or the animals. Take whatever footage you can to save and perhaps use at a later date.
TIP 8: If you can pre-scout an area, you will be much better prepared. Knowing where the sun rises and sets helps get in better position for camera angles. This is not a movie set so you need to control what you can and be prepared to adapt as needed.
TIP 9: B-Roll. This is video footage that is not the main subject of your film. Take B-Roll in 10 second increments. (Turn the camera on and literally count to 10) You may only use a few seconds of that clip, but it is there if you need it. This is footage that you edit into your final film to add tension, make it more interesting, and tie things together. It can also come in handy to cover any gaps and to even hide errors. Take B-Roll footage in a variety of perspectives of wide, medium and close-up. For instance, shoot a deer stand full wide, zoom in half way and then zoom as close as you can.

Focus on light, sun
TIP 10: When a subject is talking, the camera should always be on them. The sound will be much better. Always keep light and the sun in mind. Avoid heavy face shadows. Change shooting angles and subject position if possible. When shooting video on a cell phone, always turn the phone sideways to shoot in landscape mode. Think of how your eyes are oriented — they are aligned horizontally, not vertically.
TIP 11: Plan out what you want to document. What are your expectations for the beginning, middle and the end? Having the story laid out in your mind helps the flow and ensures you get all the video necessary to edit into a smooth flowing, interesting video.
TIP 12: Always have multiple batteries and memory cards. Even the best camera is useless if a battery dies or you run out of storage.
TIP 13: For devices that have voice control like newer GoPro’s, use manual operation as it is more reliable and can be done silently if the situation requires. Once you capture a special moment — fish strike or landing, deer or duck shot, etc. Stop recording. It will be easier to locate that clip when editing as you know it will be located at the end of the clip.
TIP 14: Get a dry bag. The outdoors are hard on equipment and the weather can change at any moment. Electronics and water do not mix. A quality, dedicated dry bag is a great investment to keep your gear protected. If you don’t have one, carry a large Ziploc or even a garbage bag for use in a pinch.
TIP 15: We as sportsman understand the harsh realities of taking fish and game. Yes, there is blood and death. We respect our quarry, but sometimes that is hard to explain to those that do not participate. The hard parts of what we do is sometimes best left out and the story told with images and words to best promote our heritage.
At the end of the day, this is supposed to be fun and help encourage others to participate or at least better understand what we do as sportsmen. The chance of becoming a YouTube star is remote. The most important result is the story. Producing quality, interesting and informative video, whether it is for your personal memories or sharing with the world is the best way to explain what we do, how we do it, and why we do it. It may even encourage others to give it a try and, importantly, helps keep the traditions alive.
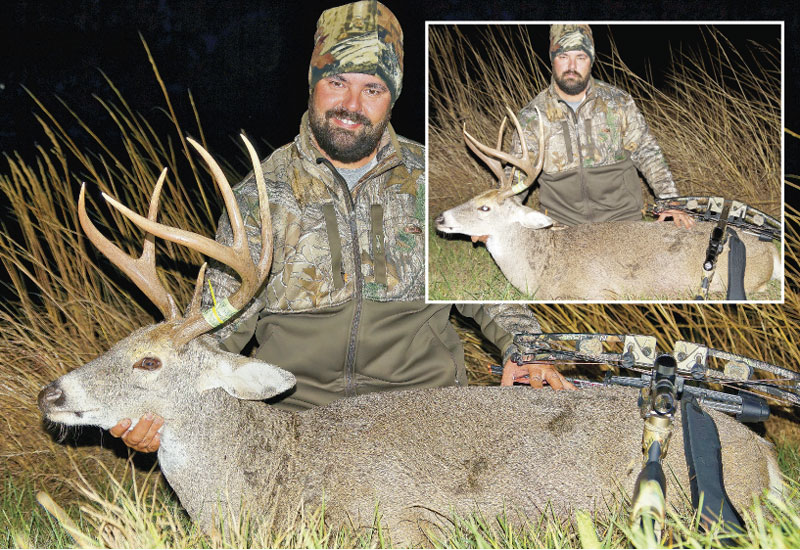
Deer photo tips
With deer season in full swing, we’ve all seen terrible photos with blood everywhere, tongues hanging out, shadowed faces, etc. Taking a little time to think and prepare for your photos shows respect for the animal and produces a shot you will be proud to share and show off for years to come. You will be amazed at how much better your photos turn out using these simple tips:
- Carry a small pack of baby wipes or moist towelettes in your pack. Wipe away as much blood as possible. Use the used wipes to pack the hole to stop/limit more blood from coming out. Move the deer to a spot with less blood on the ground and/or use leaves and grass to cover ground blood.
- Select a site for the photo that is representative of your hunt. Natural settings are much better than the bed of a truck, on an ATV, or hanging from the skinning rack.
- Tuck the tongue back in or hide it — tongues hanging out look terrible.
- Position the deer with legs tucked or on a rock or stump to get some elevation if possible.
- Take the photo from a low angle looking up at the hunter and the deer.
- Take shots from many different angles and positions — digital photos are free and you can simply delete the ones you don’t want.
- Talk to the hunter. Get them to smile, turn their head for different angles.
- Position the deer where the light will be to the photographer’s back.
- Place the hunter seated behind the deer and have them hold with as few fingers as possible.
- Move the antlers up/down, left/right to see where they show off the best.
- Tip the hunters cap up high to lessen shadows on the face.
- Use fill flash, even in bright sun.
- Be aware of the background to avoid objects that take away from the photo — sticks/branches that appear to be coming out of the hunters head, trash, etc.
- If using the gun/crossbow in the photo make sure it is unloaded and pointed in a safe direction.
- To avoid that dead white or green eye look (flash), carry a pair of high-quality taxidermy glass eyes. Pop the eyes in over the natural eyes and align the pupils horizontally.
- You don’t have to get the whole deer in the frame for a good photo.
- And finally, take photos of just the deer and perhaps with your gun or bow.