Cocodrie anglers looking for quick limits and plenty of options need only head east to Lake Barre.
The day after Thanksgiving, my 17-year-old daughter and I went deer hunting at our club lease in St. Helena Parish, near the community of Grangeville.
Jessica saw more deer than anyone else hunting at the club that evening — four does and yearlings. I saw absolutely nothing. It was a dry afternoon for me, and I’m glad I didn’t get a shot.
Getting ready to go out and get in box stands overlooking prepared food plots, I was moving to climb on my ATV, when my rifle sling slipped off my shoulder, dropping the 11-pound rifle muzzle first onto the packed gravel and clay pan of the camp yard.
I cringed as I saw the barrel bounce off the hard gravel base, and vibrate throughout the length of the gun. I scooped it up with a sick look on my face, pulled the bolt and looked down the barrel from the muzzle end. Of course, the rifle was unloaded to begin with.
The edge of the muzzle had taken the blow, actually scoring it and scratching the blueing. But the crown where the rifling ends was untouched.
There was a tiny bit of dirt and dust particles inside the crown. I blew them out, and saw Jessica staring at me. While a good and safe shot, the intricacies of rifles and accuracy still escape her. She looked quizzically, and asked, “Was it hurt?”
“I’m sure it is,” I said. “They don’t take a blow like that and stay tuned. But the barrel’s clean. Nothing to do but go hunting. I don’t have a spare rifle, and we don’t have a place here to shoot, or the time to check it.”
So we went, and I saw nothing. She came back pleased at having watched does and yearlings feeding in front of her most of the time she was on the stand, and spent a goodly portion of that time practicing her aiming on the does.
Sunday afternoon, I set up on my personal range to resight my rifle, and test hers. Knowing the rifle was probably off a good bit, I moved down to 50 yards and set up, aiming at the center of a 2-foot-square target paper.
The bullet didn’t even touch the paper.
Now I knew I had a problem. So I moved down to 25 yards, pulled the bolt and attempted to boresight down the barrel, using the bore like a peep-sight, and adjusting the crosshairs to the center of the target. But this is hard to do without someone else to hold the rifle tight and steady while you adjust the crosshairs. Every time I lifted my head to peer through the scope after I centered the bore, the rifle moved.
Figuring it couldn’t be so bad I couldn’t figure it out from 25 yards, I put the crosshairs on the center aiming point of the target, and let another one go.
Again, nothing. I didn’t even hit the paper, and that at 25 yards. This time, I had apparently knocked the bore and scope out of alignment right and proper.
Disgusted, I lugged the big rifle back up to the house and my reloading bench, where I dug out my Spot Sight (bndarwin@bellsouth.net, 334-874-1312), and started boresighting the scope.
I wrote about this innovative tool several years ago. It’s an inexpensive laser boresighting tool that fits in the end of any barrel, and projects a red laser dot from the end of the barrel onto a flat surface.
You then adjust your crosshairs until the vertical line is bisecting the red dot, and the horizontal line is resting on top of it. This should put you on the paper near center at 25 yards.
At this point you can start fine-tuning the sight picture at 100 yards until you have the rifle shooting where you want it. It works beautifully, and is extremely easy to use when boresighting a scope.
But the Spot Sight is much more, I’ve discovered. It is also a checking system to ensure your scope is still perfectly sighted. The graduated scale on the tube of the laser allows you to set the laser beam to your scope once the rifle is sighted in, adjusting it until it is set with the crosshairs. You measure the distance to the reflective surface you are using (the wall, for instance) and thereafter, measure that distance to the reflective surface, dial in your number, and set the scope to the red dot of the laser.
The company has testimonials from professional shooters such as members of police SWAT teams stating they demonstrate the product by letting anyone fiddle with the settings on their scopes, and then use the Spot Sight to bring the scope back into perfect setting to one minute of angle — off one inch from point of aim at 100 yards!
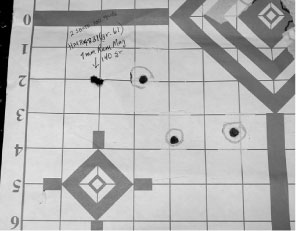
As expected, the red dot was pulsating brightly on my wall from 20 feet away, and showed up in the scope in the center of the lower left quadrant. I adjusted the crosshairs until they showed the sight picture as described above, and went back out on the range.
This time, I didn’t take any chances. I started at 25 yards, and shot at the center again. The bullet struck this time off a few inches in the lower left quadrant of the target. I adjusted the bullet strike with the scope until it was hitting about ½ inch low at 25 yards, and moved out to 100 yards where I finished sighting it back in at 2 inches high at 100 yards, which is where I like this rifle to strike.
I’ve had rifles drop out of deer stands and hit butt-end first from 16 feet up. I’ve had them fall over when leaned against a wall. I’ve had them drop and take blows in about every conceivable manner one can imagine, and I’ve NEVER had one knocked out of alignment as badly as this time.
So I got to thinking, last month’s column was about mounting a scope. This month, since we’re in the depths of deer season, maybe some tips on testing your rifles to see if they’re still sighted in would be appropriate. We should always treat them like the fine, highly-tuned instruments they are. Unfortunately, under the circumstances of hunting — a rough, physical sport — that is not always possible.
Not all of us have a professional tool like a Spot Sight (even though I highly recommend it for a quick, accurate check of your rifle’s sight settings), but properly testing a rifle for accuracy is simple and easy to do well, if you’ll only take a small amount of care in your preparations.
First, and foremost, you should have at least 100 yards of safe, back-stopped shooting area, and a good, solid base to rest your rifle on. Even the hood of a vehicle will work in a pinch. I’ve done some of the finest long-range shooting of my life over the hood of Ford and Toyota pickup trucks, but I always had blankets and sandbags to lay over the hoods when I shot.
If you’ve got a good, solid table or shooting bench, you need some sort of sandbags to rest on. Andy Crawford, staff writer for this magazine, uses a couple of legs of some old bluejeans filled with rice, and the ends sewn up. I like rice, beans or cat litter because they’re a lot lighter filler material than sand, and work about as well.
My own personal favorite shooting bag is a Hughes Ballistic Shooting Bag, about 18 inches long, with an indented channel the length of the bag to rest the rifle on. The channel is lined with leather to grip the rifle forearm, while the rest of the bag is made of heavy-duty ballistic cloth. You can fill it with sand, but mine is filled with cat litter. This material seems to work as well, and is a heck of a lot lighter to carry around.
It makes as solid a rest as I have seen, allowing the entire forearm of the rifle to rest in the channel along the top of the bag. Frequently, I like to also put a smaller bag at the “toe” of the rifle butt, pulling the butt into my shoulder and down into the smaller bag, making as solid and immovable a rest as is possible.
If the rifle is shooting somewhere in the vicinity of the point of aim, and you can see the bullet hole on the target, return your crosshairs to the original point of aim on the target after you have made the shot. Hold the rifle tightly in place, and adjust the crosshairs of the scope until they move from your aiming point and intersect with the bullet hole you just made.
This will bring the scope into perfect alignment with the barrel, assuming the rifle shoots fairly tight groups. This is known as the “one-shot sight-in,” a bit of a misnomer because you generally don’t want the rifle shooting dead-point-of-aim at 100 yards, but this will put it exactly at the center of the target aiming point, and you can easily now adjust your point of impact however high above the point-of-aim you prefer.
One of the frustrating things that can occur when trying to sight in a rifle is scope “jump.” This is the aggravating propensity of many scopes to not adjust to the crosshairs until after the shot is fired. I have worked scopes so bad about this, I used junk ammo, and would fire a single shot of the junk each time I adjusted the crosshairs, before shooting a three-shot test group with the good ammunition.
Sometimes the point-of-impact can move several inches from the initial shot when the crosshairs are jarred into place. This is not much of a problem with the higher-end scopes, but all of them can show this tendency after they get some age on them, and the springs develop a “set.”
David Reynerson and Pete Underwood, both prominent Baton Rouge gunsmiths, recommend turning the windage and elevation knobs on the scope past the point you desire. In other words, if you figure you need eight clicks of adjustment, turn 12 or so clicks, and then turn back to eight clicks. This should free the spring up, and bring it into proper setting.
Underwood further recommends keeping a plastic-handled screwdriver near by, and rapping the retaining rings holding the scope, this will also jar the crosshairs into position, allowing for quicker sight-ins. Be sure and tap on the rings, not the scope itself.
Cleanliness is next to godliness. Clean your barrel until it shines inside. You don’t want to start testing for accuracy with a dirty barrel. It’s only going to get dirtier, and degrade the accuracy. I have one rifle that shoots one-hole groups out of clean barrels. After 10 or so shots, the groups widen noticeably.
A good, solid rest over a firm bag apparatus such as the Hughes bag, or a similar sandbag, will allow you to hold steady on the target while squeezing off three slow shots.
Taking the center of these three shots, measure the distance in inches in windage and elevation to reach the point-of-aim you desire (usually 2 to 3 inches high at 100 yards.) Most scopes have micrometer-type knob adjustments, and move the point of impact anywhere from ¼ inch to 2 inches with each graduated mark.
If you used the one-shot method, your group should be very close to your target’s aiming point. It should be a simple matter now to adjust the bullet strike slightly higher to allow for longer shots without having to use “holdover” on the animal you are hunting.
I know most folks who hunt deer are going to test their rifles by leaning over the hood of a nearby pickup truck, throwing a gallon milk jug downrange about 75 yards, and shooting at it.
And when they hit it, they pat the stock, make a comment about faithful ol’ Betsy they never have to sight in and how she stays “on” year after year. And most of these folks will probably kill a deer or two because contrary to popular estimation, most deer are killed at around 50-75 yards, and at that range, perfect accuracy isn’t crucial.
But to you anal sorts out there, to whom a well-tuned rifle is a pleasure and an utter confidence builder when that buck steps out a couple of hundred yards away, remember this: Never trust that your rifle will be perfectly “on” after it takes a blow or a fall. It won’t be, and it’s so easy (and so much fun) to check it out.

")