The Atchafalaya Basin doesn’t fit the stereotype for ideal turkey grounds, but the birds that flourish there haven’t seemed to notice.
Today’s fish finders have automatic modes that can tune in a better sonar picture than probably 90 percent of fishermen could come up with adjusting it manually. But their artificial intelligence is still a bit short of the genius level, and they still have a few wrinkles that can be ironed out with a little human intervention.
Monochrome fish-finder displays are following black-and-white television screens off into the sunset. Color displays outperform them in every way with the possible exception of screen visibility under some light conditions, but this can be corrected manually.
I have been able to tune in a screen picture that easily shows important details on every color unit I’ve tested over the last few years under light conditions ranging from direct sunlight to pitch darkness. I crank up a screen’s backlighting to counter bright sun and glare, but turn it down at night. Next, I try each of the available screen background colors and select the one that looks best under the current light conditions. Finally, I tweak the brightness and contrast controls to zero in on the sharpest, most visible screen picture.
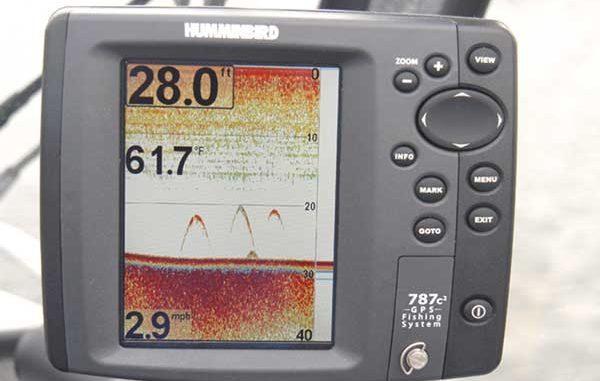
One thing that bugs me about most automatic depth-ranging features is their tendency to print the bottom contour in the middle of the screen most of the time. As the boat moves shallower, some auto modes let the bottom contour come nearly to the top of the screen before they shift to the next shallower depth range, and when they finally shift they just drop the bottom indication to the middle of the screen instead of the screen’s bottom edge, where it belongs.
Conversely, as the bottom drops off, units tend to shift to the next deeper range way too soon and still keep the bottom indication just halfway down from the top of the screen.
Showing the bottom of the lake in the middle of your screen wastes half your vertical pixel count. If you paid extra for a unit with a 620 or even 480 vertical-pixel display and you let the bottom contour stay in the middle of it, you might as well have saved a bundle and bought a unit with a vertical pixel count of just 320 or 240.
The easiest fix is to switch to manual depth ranging and set a range that puts the lake/river/ocean bottom at the bottom of the screen while you are cruising or fishing. I like to use a split screen view while fishing with the top-to-bottom picture on one side and a zoom view of the depth segment showing the fish I’m after on the other.
If the fish are on the bottom, I’ll set the zoom window to show the bottom and the 10-20 feet of water just above it. If the fish are suspended at 20 feet, I’ll set the top of the zoom window at 10 feet and the bottom of it at 30 feet so I can divide the 20-foot depth segment surrounding the fish with my screen’s entire vertical pixel count.
This way, one side of the screen magnifies my view of the fish while the other side shows the whole top-to-bottom water column so I don’t miss important details like schools of baitfish or other game fish suspended above or below my zoom window.
I’m also not always entirely happy with the way a fish finder’s computer sets the sensitivity adjustment. Most units don’t automatically set it high enough to see a thermocline while you’re fishing, yet set it so high while cruising that interference hides important details.
Luckily, most units let you tweak the sensitivity manually while in auto mode, and adjusting it properly for any set of conditions is easy. Turn it up until you begin to see random dots of interference all over the screen, and then turn it back down until they just disappear. You’ll find you need more sensitivity while fishing and less while cruising, and more in deep water but less in shallow water.
These tuning tips help show me more of what I want to see and less of what I don’t on a screen that’s easier to read under all light conditions.


")