These hunters expect to see limits of teal every day of the season.
It has been two years since Hurricane Katrina devastated our area. It’s hard for me to believe, but I’m still getting a large amount of work that is related to the aftermath of that storm. In the months immediately after the storm, I saw a lot of obvious storm-related damage to boats. I had the unpleasant job of informing customers their engines and/or boats were a total loss due to submersion damage. There were some boats that were reparable, but I never dreamed that two years after the storm I would still be dealing with storm-related engine problems.
The latest problem to surface has been more of an indirect result of Katrina. In the last several months, I have had a very large amount of boats brought in that customers have not used since Katrina, and now the engines won’t start, or if they do, they run very rough and kill constantly.
In talking to these customers, I have found that most of them have been busy for the last two years repairing their homes and businesses. They have not had time to think about the boat, so it has been left parked in the garage.
The fuel that was left in the carburetors when the engine was last used more than two years ago has evaporated, and left a gummy varnish. This varnish clogs the carburetor jets and causes the engine not to run properly.
Many customers have tried some of the products that you can add to your fuel or spray directly into the carburetor to clean the fuel system, but they have little or no effect on the problem.
What most customers do not realize is that inside the carburetor there are some extremely small passages that the fuel flows through. Once the varnish clogs up a passage, nothing flows through that passage including these cleaners. The unfortunate truth is that once a carburetor becomes stopped up with dirt, varnish or water, the only way to properly clean it is to remove it from the engine, completely dismantle it and soak it in a chemical cleaner that is designed to penetrate all of the tiny passageways, dissolve and remove the problem clogs.
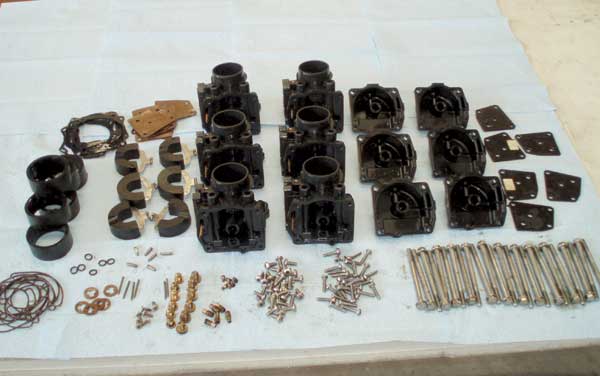
Most outboard motors have multiple carburetors. Sometimes there are minor differences in each of these carburetors due to throttle linkage or fuel-line connections. It is important to mark each carburetor as you remove it from the engine so that you can put it back in the same location when reassembling.
Once removed, disassemble each carburetor completely. Separate the individual parts into two categories — metal and plastic. The metal parts should be soaked in your carburetor cleaner for two or more hours depending on how dirty the carbs were.
Carburetor cleaner is a harsh chemical, and can sometimes damage plastic and rubber components of your fuel system, so do not put these items in the soak tank. Instead, you can wash them off with a mild soap solution and warm water.
Once all metal parts have soaked in the cleaner, then remove them and rinse them thoroughly with clean water. Next, I like to spread out two or three shop towels on the work bench. I use my air compressor to blow dry all of the parts and lay them out on the bench for reassembly. The carburetors are then reassembled using all new gaskets and O-rings and any other parts that may come in the carburetor repair kits I have purchased for this engine.
You might be tempted to go ahead and install the carburetors on your engine and crank her up. This could be a big mistake. The gas in your boat’s tank is also over two years old. It is stale and possibly contaminated.
Before reinstalling your carburetors, you should drain the gas tank completely. The tank can then be refilled with fresh gas. Replace all fuel filters and flush out all of the fuel lines going from the tank to your carburetors.
Don’t forget that the fuel pump may also be a source of contamination. It should also be rebuilt at this time. Remember that this old gas may be stale, but it can be dangerous to handle. Even stale gasoline fumes can be explosive. Be sure you are in a well-ventilated area, and there is no source of flame or spark that could ignite the fumes when you are draining the tank.
The gas should be drained into containers approved for gasoline and then taken to a facility to be properly recycled or disposed.
Once the fuel system has been completely flushed out, you can now install your rebuilt carburetors and finish the job. After all of the carbs are installed and the engine is reassembled, it is time to crank it up and make your final adjustments. Check your service manual for the proper engine RPM at idle, and adjust the idle stop screw accordingly.
Once the idle stop is adjusted you may need to fine-tune the idle jets so that the engine will idle smoothly. Don’t over adjust your idle jets. If you lean out the idle jets too much, the engine will idle smoothly but will have problems when you accelerate. Most outboards need to idle a little rich. This allows the engine to build up a little excess fuel in the intake chambers, which can be used for a more responsive acceleration.
Have fun on your next fishing trip, and be safe on the water. If you need any help with your boat, motor or trailer, you can contact me via e-mail at hanktheboatdr@yahoo.com.

")