
 Heat the mold by laying it over the top of the pot for 10 minutes.")
 While the mold is heating, assemble hooks to wires and set them aside.")
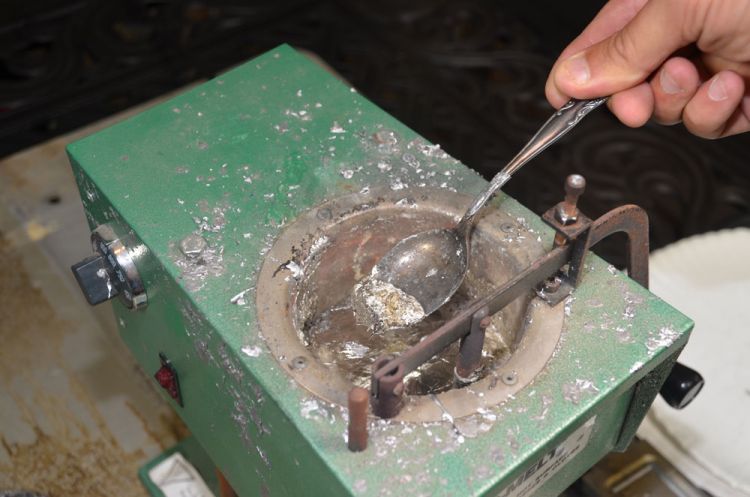
 Ladle lead into the closed mold, open it, remove the slugs and add them back into the pot. Do this five times to heat the mold adequately.")
 Lay the assembled hooks and wires into the molds.")
 Close the mold and ladle lead into the cavity. Pour one head at a time into the cavity of choice. Set the mold aside to cool. Remove the heads with pliers to prevent burns. Before ladling another head, stir the molten lead.")
 Sort the imperfect heads for re-melting and re-casting. The collar where the skirt will go is usually where defects occur. If the mold is too cool, the lead will solidify before reaching the collar, as it did in the one on the right.")
 Snip off any lead over-pour for re-melting. Grind the head smooth for painting with a cone-shaped Dremel grinding bit.")
 Use a small brush to paint a white base layer of lure paint or fingernail polish on the head, and then hang them to dry.")
 After drying, paint them again with the final color desired. After drying they may be painted with glitter fingernail polish or stick-on eyes may be added.")
 After drying, paint each head with a layer of clear-coat Devcon Two-Ton Epoxy and hang to dry. This seals and hardened the finish and makes it shiny.")
 Run a bead down the arm, followed by a clevis with a blade on it, and then add two more beads. Important: The convex side of the clevis must face forward or the spinner won’t work.")
 Use a pair of round-head pliers to bend a loop in the tip end of the arm.")
 Assemble a small swivel and blade to a split ring. Insert the loop on the end of the wire arm through the free end of the swivel and crimp the loop closed.")
 Insert the point of the hook through a skirt’s collar and shove the skirt onto the head.")
 The finished lure is now ready to fish.")
Tony Landry for years built his own spinnerbaits as a hobby, adding that it had a lot more to do with his love of tinkering and less about saving money than one would think.
Besides being satisfying building your own lures allows for endless experimentation.
Supplies for making spinners can be ordered through online from several lure parts and components companies.
Because making spinners involves handling molten lead, Landry offered several safety tips:
• Use a very stable work table or bench.
• Wear eye protection. Long sleeves and gloves are optional, but advised.
• Under no circumstances should water be allowed near the molten lead. One drop will cause an explosion of lead from the pot.
Landry uses an RCBS Pro-Melt Lead Furnace to melt his lead, but a variety of other pots exist. At the very least, a cast iron pot and cast iron ladle should be used. Molten lead is 621.5 degrees.
1) Melt lead for making heads in a melt pot, skimming slag from the surface of the molten lead and discarding it.
2) Heat the mold by laying it over the top of the pot for 10 minutes.
3) While the mold is heating, assemble hooks to wires and set them aside.
4) Ladle lead into the closed mold, open it, remove the slugs and add them back into the pot. Do this five times to heat the mold adequately.
5) Lay the assembled hooks and wires into the molds.
6) Close the mold and ladle lead into the cavity. Do-It molds have cavities for 1/8-, ¼-, 3/8-, and ½-ounce heads. Pour one head at a time into the cavity of choice. Set the mold aside to cool. Remove the heads with pliers to prevent burns. Before ladling another head, stir the molten lead.
7) Sort the imperfect heads for re-melting and re-casting. The collar where the skirt will go is usually where defects occur. If the mold is too cool, the lead will solidify before reaching the collar, as it did in the one on the right.
8) Snip off any lead over-pour for re-melting. Grind the head smooth for painting with a cone-shaped Dremel grinding bit.
9) Use a small brush to paint a white base layer of lure paint or fingernail polish on the head, and then hang them to dry.
10) After drying, paint them again with the final color desired. After drying they may be painted with glitter fingernail polish or stick-on eyes may be added.
11) After drying, paint each head with a layer of clear-coat Devcon Two-Ton Epoxy and hang to dry. This seals and hardened the finish and makes it shiny.
12) Run a bead down the arm, followed by a clevis with a blade on it, and then add two more beads. Important: The convex side of the clevis must face forward or the spinner won’t work.
13) Use a pair of round-head pliers to bend a loop in the tip end of the arm.
14) Assemble a small swivel and blade to a split ring. Insert the loop on the end of the wire arm through the free end of the swivel and crimp the loop closed.
15) Insert the point of the hook through a skirt’s collar and shove the skirt onto the head.
16) The finished lure is now ready to fish.