 Saw this pattern out on a band saw.")
 Draw the general shape of the decoy as it will be viewed from above. A pattern board may be used, or the shape may be drawn free-hand. Saw this pattern out on a band saw.")
 Use a very sharp hatchet to remove the square edges of the block.")
 Refine the edges with a sharp knife. Kingsmill uses a wood-carving knife; old-time carvers simply used their pocket knives.")
 Rasp the body to further refine the edges.")
 Sand the body with 80-grit sandpaper.")
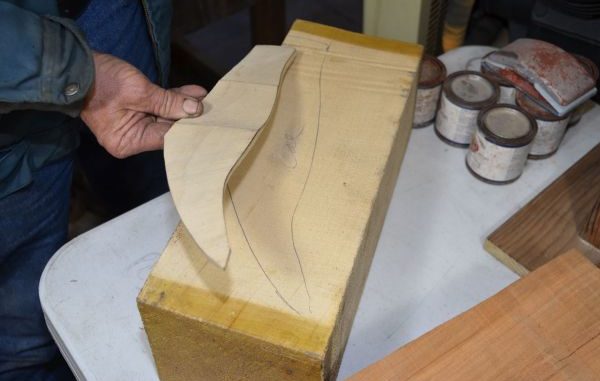
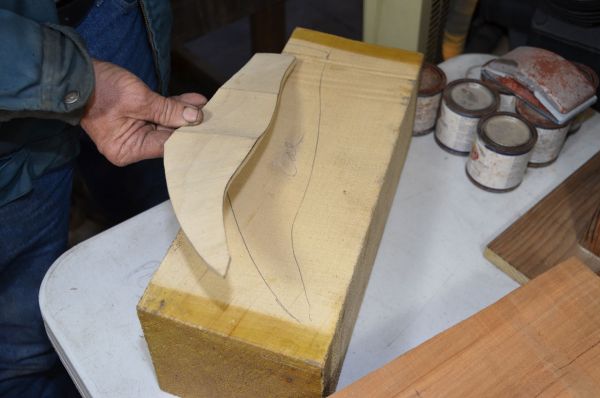
 Draw a center line from the tip of the tail halfway up the back of the body, and then outline the wings to meet on that
center line.")
 Use a shorter knife to carve out grooves along the wing lines to provide some relief. Sand the edges.")
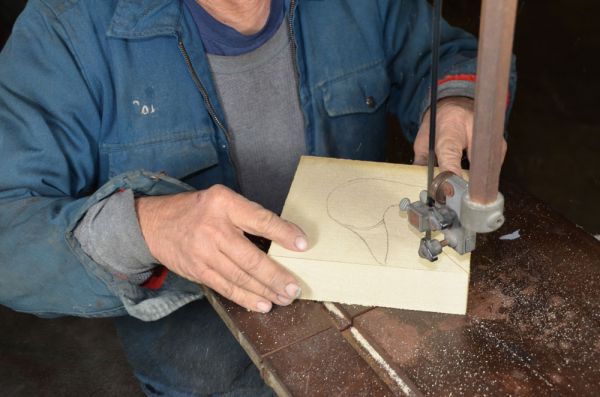
 Draw the head pattern on a 2-inch thick piece of tupelo wood. The wood grain must run from the front to the back of the head, not crossways. The weakest part of any decoy is the bill.")
 Draw a center line from the tip of the bill across the top of the head. Follow this with a horizontal line across the front of the head where the bill will meet the head, and then draw cheeks on the sides of the head where the bill will meet the head.")
 Draw the outline of the bill. All of the other lines were necessary to keep the bill and head proportions accurate.")
 Rough-cut the excess wood off the head with a band saw. Use a sharp knife to partially shape the head and carve out the curved line where the bill meets the head.")
 Carve out the bill and finish shaping the head. Sand the head to finish.")
 Viewing the head from the side, mark one eye spot. Then, holding the head between the knees, mark both eyes simultaneously with pens to assure symmetry.")
 Use a ¼-inch bit in an electric drill to drill the eye spots 3/8 inch deep. Fill the holes with plastic wood filler, and then firmly insert No. 6 glass taxidermy eyes.")
 Part I: Mark the base of the head with crossing lines to establish the center for drilling. Draw a vertical line up each side of the head. Using these lines as a guide, drill a 3- to 5-inch-deep hole in the neck with a ¼-inch bit.")
 Part II: Insert a dowel rod into the hole and saw it off flush with the bottom of the neck. The rod strengthens the neck. Glue the head to the body with Devcon Home 5 Minute Epoxy. Fill the neck joint with plastic wood, and sand it after it dries.")
 Apply three coats of Deft Satin Brushing Lacquer to the entire decoy, including the eyes. Allow each coat to dry for several hours before applying the next coat. With another brush, apply two coats of Liquitex Professional Gesso 1 ½ hours apart.")
 Part I: After the decoy dries, sketch lines on it with a pencil wherever major color breaks will occur, including the speculum. Paint the decoy, beginning with the base coat or coats of the predominant colors.")
 Part II: The painting can be as simple or as elaborate as desired for a hunting decoy. When dry, scratch any paint off the eyes.")
 Part I: Strap a flat decoy weight with a hole drilled in each end to the bottom of the decoy with rubber bands and float it in a container of water. Experimenting with the weight might be necessary.")
 Part II: Too heavy and the decoy will set too low; too light and the decoy will not be self-righting. Adjust the position of the weight to make the decoy sit level on the water.")
 Attach the properly positioned weight with brass screws, and then nail a small fence staple in front of the weight for line attachment.")
 The decoy is now ready for hunting.")
Carving waterfowl decoys sounds incredibly intimidating. Not so, said Cal Kingsmill, probably the visible ambassador for the art.
Every year, Kingsmill mans booths at the Louisiana Sportsman Show and the state convention of Ducks Unlimited, where he casually chops out and sands decoy bodies. All the while, he reassures people in his low-key manner that the art is simple to participate in, as well as rewarding.
Kingsmill stressed that the decoys don’t have to be perfect to work, but he cautioned that it can become addictive.
“Once you make your first decoy and a duck comes into it, you’re hooked,” he said. “Every decoy you make will be a little bit better.
“Nobody ever goes backwards, back to plastic.”
Good wood is critical for making working decoys, Kingsmill stressed.
Tupelo gum is the norm for decoys, but he calls cypress root wood “gold” for making decoy bodies.
Even if the bodies are made of cypress root, the heads are still carved from tupelo.
Wood may be purchased through Curt’s Wildfowl in Bourg, Kingsmill explained.
Cutting your own is also an option if one has access to property.
“The wood has to be cured,” he said. “It has to be dried slowly, out of the sun.
“Wood for a small decoy, like teal needs to dry five weeks. For a goose decoy, it takes six months.”
Here are the steps to making working decoys.
1) Lay out the pattern of the side view of the decoy using a pencil, with or without a pattern board.
2) Saw this pattern out on a band saw.
3) With a pencil, draw the general shape of the decoy as it will be viewed from above. A pattern board may be used, or the shape may be drawn free-hand. Saw this pattern out on a band saw.
4) Use a very sharp hatchet to remove the square edges of the block.
5) Refine the edges with a sharp knife. Kingsmill uses a wood-carving knife. Old-time carvers simply used their pocket knives.
6) Rasp the body to further refine the edges.
7) Sand the body with 80-grit sandpaper.
8) With a pencil, draw a center line from the tip of the tail halfway up the back of the body. Draw the outlines of the wings to meet on the center line.
9) Use a shorter knife to carve out grooves along the wing lines to give wing relief. Sand the edges.
10) Draw the head pattern on a 2-inch thick piece of tupelo wood with a pencil. The wood grain must run from the front to the back of the head, not crossways. The weakest part of any decoy is the bill.
11) Cut out the head pattern with a band saw.
12) Draw a center line from the tip of the bill across the top of the head. Follow this with a horizontal line across the front of the head where the bill will meet the head, and then draw cheeks on the sides of the head where the bill will meet the head.
13) Draw the outline of the bill. All of the other lines were necessary to keep the bill and head proportions accurate.
14) Rough-cut the excess wood off the head with a band saw. Use a sharp knife to partially shape the head and carve out the curved line where the bill meets the head.
15) Carve out the bill and finish shaping the head. Sand the head to finish.
16) Viewing the head from the side, mark one eye spot. Then, holding the head between the knees, mark both eyes simultaneously with pens to assure symmetry.
17) Use a ¼-inch bit in an electric drill to drill the eye spots 3/8-inch deep. Fill the holes with plastic wood filler, and then firmly insert No. 6 glass taxidermy eyes.
18) Mark the base of the head with crossing lines to establish the center for drilling. Draw a vertical line up each side of the head. Using these lines as a guide, drill a 3- to 5-inch-deep hole in the neck with a long ¼-inch bit. Insert a dowel rod into the hole and saw it off flush with the bottom of the neck. The rod serves only to strengthen the neck. Glue the head to the body with Devcon Home 5 Minute Epoxy. Fill the neck joint with plastic wood and sand it after it dries.
19) To prevent the finished decoy from absorbing water, us a paintbrush to apply three coats of Deft Satin Brushing Lacquer to the entire decoy, including the eyes. Allow each coat to dry several hours before applying the next coat. With another brush, apply two coats of Liquitex Professional Gesso 1 ½ hours apart.
20) After the decoy dries, sketch lines on it with a pencil wherever major color breaks will occur, including the speculum. Paint the decoy, beginning with the base coat or coats of the predominant colors. The painting can be as simple or as elaborate as desired for a hunting decoy. When dry, scratch any paint off the eyes.
21) Strap a flat decoy weight with a hole drilled in each end to the bottom of the decoy with rubber bands and float it in a container of water. Experimenting with the weight might be necessary. Too heavy and the decoy will set too low; too light and the decoy will not be self-righting. Adjust the position of the weight to make the decoy sit level on the water.
22) Attach the properly positioned weight with brass screws, and then nail a small fence staple in front of the weight for line attachment.
23) The decoy is now ready for hunting.
")