Psst. Want a good deal on a scope?
I’m looking to swap, since I just mounted a scope on my main long-range rifle, and am really not satisfied with it.
Changing out a scope really is an easy thing to do. All too many shooters take their rifles to gunsmiths to have telescopic sights mounted on them or swapped out as they change optics and upgrade.
I’m not knocking having a gunsmith do anything. Certainly I’ve spent my share of cash over the years on a number of gun projects — frequently on something I could do but just didn’t have the time (or the inclination) to do myself.
But mounting a scope is so easy, and easy to do right, it seems ridiculous to pay someone to do it, unless you are just absolutely too busy or too ignorant of simple tools to do it yourself.
For a number of years, I’ve wanted to increase the horsepower of the variable scope on my favorite rifle, a Parker-Hale Mauser-action bolt chambered in 7mm Remington Magnum. I had Pete Underwood, a Baton Rouge gunsmith, rebarrel it several years ago after it became apparent the original barrel had throat erosion, and had deteriorated from ¾-inch groups to 2 ½-inch groups.
I was delighted to discover a load the new Douglas barrel liked enough to give me ragged-hole three-shot groups at 100 yards, so the rifle was even better than new.
A good rifle deserves good glass, and I’ve seen a lot of nice rifles where owners had skimped on mounting systems and scopes — an insult to the quality of the arm and a hindrance to its capabilities.
Mine had sported a Leupold Vari-III 3.5-10 with adjustable objective. Now many old timers, who came up in the days when a lot of folks didn’t trust telescopic sights, and variable scopes were just undependable, would tell you even today that all you need on a rifle for all work is a plain 4-power, or at the very most, a simple 2-6-power variable scope. Their contention is that these scopes will work well at all times and at any reasonable range that the average hunter should be shooting.
And that’s true; they will suffice. Most hunters shouldn’t be taking shots at over 150 yards anyway. But if you’ve stuck with this column this long, you probably are one of the others, and like me, need and want a variable with a bit of “reach.”
So as I’ve aged, and my eyes have traveled along with me, I’ve wanted even more power than my good, dependable Leupold was giving me.
Along comes Bushnell, with their new “Rain-Guard” system from several years ago. I wanted to test it, so I obtained a 4-12 Elite 3200 with A/O, and mounted it.
It was this scope that allowed me to see the bullet holes in the target at 100 yards that glorious day the new barrel mated with the new loads to produce its first “one-hole” groups.
So if 12-power was this much better, how about 14? 16? Even 20?
I set my goals on a new Leupold Vari-III 4.5-14 with A/0. Get that, I figured, and I would have the perfect mate for my new-shooting “old” rifle. The 4.5 magnification on the low end was low enough to be useful still at close ranges, and the 14 on the high end should have been ample to see anything at any range I would be shooting.
The problem was funding. Finding the extra dollars to purchase this exceptional piece of equipment always eluded me, and the desire was always relegated to sometime in the future.
Then, on a hunting trip with Todd Masson and Andy Crawford, editor and staff writer of this magazine, Crawford mentioned a friend was looking to sell a Remington Model 700 in 7mm Rem Mag, outfitted with a Leupold Vari III Adjustable Objective in 6.5-20.
My ears perked up. I offered to buy the scope at a reasonable price, if the friend would sell it separately. He would, and I did.
I soon had possession of a practically new scope. This was the 50 mm objective — a larger objective “bell” than the standard 40 mm objective lens on most variable scopes. And this larger objective demanded a larger tube to facilitate light transmission from the larger lens.
The standard scopes with 40 mm lenses generally have a tube that is 1 inch in diameter. The tube on this scope is 30 mm, needing larger and substantially taller rings to mount the scope and keep its objective housing from touching the barrel of the rifle when it is mounted. In short, this was one BIG scope.
I removed the faithful Bushnell, and removed the 1-inch rings that supported it.
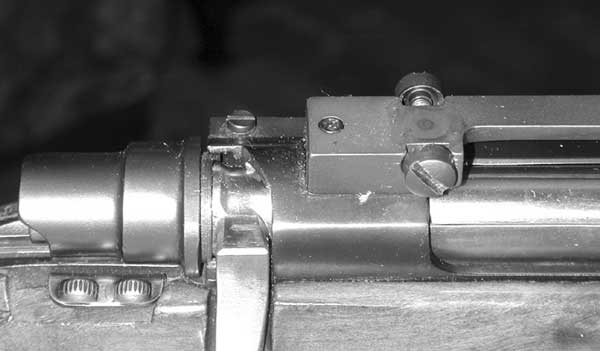
Good scopes demand good mounting systems. The recoil from high-powered rifle rounds is a punishing, snap-quick blow that will quickly seek out the weakest point of any system and exploit it.
Frequently, people complain to me of rifles that just won’t group, and the first thing I tell them to check is the mounting. Unless the scope is securely tied to the rifle by strong mounts that will not allow the scope to move, the rifle will never reach its accuracy potential.
I prefer the Leupold mounting system, which is similar to Redfield’s design, another industry standard that is hard to beat. The front rings of the Leupold system have a mortise-and-tendon design that twists into the base, locking it securely to the mounting base.
Other systems work slightly different ways. As long as they engender a solid marriage of scope-to-mount-to-rifle, most work well.
I cannot recommend the old-time Weaver system for most high-powered rifles. The Weaver system has ring bases that clamp onto the mounting base like C-clamps, tightened onto the base with large tension screws. They frequently also have hinged rings with tightening screws on only one side of the ring. The rings can be shot loose at both clamping mechanisms on high-powered rifles, and you’ll never get the rifle to group properly. (They work wonderfully well with .22s and lighter-recoiling centerfires however, and are in fact much easier to mount.)
Once you have the base mounted properly on your rifle, using thread-locking compound on the screws attaching it to the rifle, you can insert the front ring with its tendon base into the mortise cavity in the mounting base, and twist it 90 degrees, locking it onto the base.
New rings can be an utter witch to twist. Most folks use a broom handle. I used the rubber-covered handle of channel-lock pliers to twist mine. No matter, just remember it’s tough to turn for a reason — a secure mount.
Under no circumstances do you use the actual scope to twist the rings into the bases. You will quickly bend or damage the soft aluminum tube of the scope, ruining it. Once you have the front rings mounted, you begin on the rear rings.
The rear rings are flat-based with a small dove-tail indentation machined out of the bottom edges. These are gripped by hollow tubes that lip over the edges of the bases and hold them securely in place. There is one on each side.
Place the base of the ring on the mounting base, and alternately tighten the adjustment screws until the hollow grips enclose the protrusions on the bases and hold the ring in place.
These are designed this way to compensate for the small amount of lateral travel right and left in some scopes. With this system, you can adjust the horizontal setting of the scope with the adjustment screws on the base, moving the rear ring right or left.
Once you have the front and rear rings mounted securely and centered, remove the top half of the rings and set them aside. Some rings are held together by fine-thread screws that have an Allen-head design for the screw head. Leupold uses star-bit heads, and supplies a small wrench with each set of rings.
Once you have removed the top halves of the front and rear rings, set the scope in the concave receptacles of the bottom halves of the rings, and replace the top halves, tightening the screws only enough to keep the scope in place.
Now comes the tricky part. You have to have the scope mounted at the proper distance from your eye to allow an instant view when you throw the rifle to you shoulder, but you need enough eye relief to ensure you don’t get “scope-eye” when the rifle recoils.
This is accomplished by throwing the rifle to your shoulder and looking through the scope quickly. The scope should slide through the rings to the proper length from your eye so that the scope’s field of view is instantly visible.
This should be at the lower end of the settings. These settings are where you will use the scope most, generally turning it to its highest settings to review a stationery target. In other words, you’ll generally have time to adjust your field of view when you use the highest settings.
The other tricky part is making sure the vertical crosshair is perfectly perpendicular to the level plane of the rifle. This is harder to do than it seems. Once you are looking through the scope, the nasty problem of parallax raises its ugly head.
This is the tendency of the crosshairs to appear to move when your head or eye moves slightly. It causes an apparent shifting of the point of impact of the crosshairs, and can be a frustrating aggravation that will affect your own accuracy. Most modern center-fire scopes are adjusted to be parallax-free at 150 yards.
I prefer scopes with an adjustable objective. The focusing ring on the front objective housing of the upper-end scopes allows you to set the objective lens for the distance you are shooting, and virtually eliminates parallax, which can be very disconcerting when you are trying to sight on a buck at a distance, and your crosshairs are moving around on his side.
Parallax is most apparent at the low end of magnification, and you will absolutely see it happen as you try to align the vertical crosshair perfectly perpendicular to the plane of the rifle. You will see the crosshair shift slightly, making it almost impossible to determine if it is perfectly vertical.
Pete Underwood gave these tips. First, make sure the rifle is securely set in your cradle, or vise, and perfectly level. A small level, first balanced on the flat base to get the rifle level, and then balanced on the scope to make it level horizontally, will go a long way toward getting it perfectly vertical.
Of course, a collimator, which mounts in the end of the barrel and gives you a screen to view through the scope with vertical and horizontal lines, is what the gunsmith uses. But we’re not gunsmiths, right? And it isn’t necessary to have one.
Pete recommended setting up a piece of string, hanging it from the ceiling with a weight on it like a plumb bob. Then you look through the scope at the string, and physically turn the scope in the loose mounts until the vertical crosshair perfectly aligns with the string.
Unfortunately, at 6.5 magnification, even with the A/O set at its lowest setting, I would still have to hang the string at about 75 yards to have the scope in focus enough to see the string. It is just too powerful for close-in work.
So I used the same thing I’ve used in the past — the door jamb. The molding around my back door is square and perfectly vertical to the floor, I simply aligned the vertical crosshairs on the edge of the door molding and twisted the scope slightly to make the crosshair perfectly vertical. It was close to begin with, of course, because of the use of the level.
Once the crosshairs are vertical, snug the rings together firmly with the screws. These rings hold the scope, and you don’t want it slipping in them.
The next thing you do is adjust the horizontal adjustment on the scope. Turn the adjusting screw on the side of the scope all the way in one direction until it stops. Then turn it back all the way, counting the number of full revolutions it makes. Once it stops again, turn it back half the number of turns. This ensures the scope is set in the middle of its adjustment scale.
When you boresight the scope, you will use the adjustment screws holding the rear base to align the scope horizontally on the target. Once you begin shooting, you will use the scope setting screws to fine-tune the crosshair.
So now, I have the scope mounted on the rifle, and it is one fine-looking piece of equipment, I must say. I used it to scan my pasture from my carport, and clearly watched mourning doves feeding in the field at nearly two hundred yards. I could clearly tell they were mourning doves, and not the European or ring-necked variety.
It’s a heck of a scope; edge-to-edge clarity is outstanding at all power levels. The light-gathering quality is incredible as it is with all Leupolds, and the sharpness allowed me to clearly see the plain necks of the birds at nearly 200 yards. It will be a heck of a varmint scope.
And that’s the problem. This is not first a varmint rifle. It is first a deer rifle, and I find the 6.5 low-end magnification still a bit too high for my tastes. After all, sometimes they walk out a lot closer than 100 yards.
So if anyone out there has a 4.5-14 AO Leupold, and thinks they’d like to step up a hair, boy, do I have a scope for you.
We can talk trade, and I’ll even throw in a free dismounting and mounting lesson on both scopes.
Send your comments or gun questions to Gordon Hutchinson at gunsafeofla@aol.com.
")