Setting up trail cams in the right spots will put smiles on the faces of even the most seasoned deer hunters.
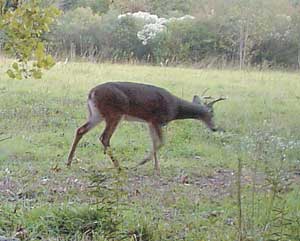
You know he’s out there. You’ve seen the signs he’s left behind: large tracks, rubs on trees the size of your leg, scrapes the size of a wash tub.Yet he has repeatedly managed to give you the slip despite the hours you’ve spent on stand. Frustration is setting in, and you need an advantage.
In the past, you might have resorted to placing string across a trail as a way of monitoring the area. Or you might have even gone high-tech and bought a string trail timer where the string you’ve stretched is connected to a clock.
The trouble with these now-primitive methods is that you were limited to only one event per setting, and you really had no idea what kind of animal actually passed through, much less if it was a buck or doe.
Ah, but now the tools at your disposal are significantly more powerful. Enter the game camera, a.k.a. trail camera or trail cam. Trail cameras are connected to infrared sensors that trigger the camera to take a picture any time an animal crosses the sensor’s beam.
The use of trail cams by deer hunters has skyrocketed during the last few years. Trail cams are no longer reserved for a select few whitetail addicts. The use of trail cams has become almost the norm rather than the exception, as technology becomes more user-friendly and less expensive. Deer hunters love them, and this recent surge in use shows no sign of letting up anytime soon.
Through the use of trail cameras, hunters often receive a boost in confidence and a surge of determination after discovering that there are more bucks roaming the woods than they had realized.
The trail cams also invariably reveal that the bucks, especially the big bucks, do most of their traveling at night. Despite the nocturnal nature of the deer, hope springs eternal, and hunters who use trail cams tend to develop an addiction to the excitement of finding new images.
The hunt can almost become a secondary event to the anticipation of checking the camera for new pictures. After all, when we enter the woods we know the odds are stacked against us, yet like running a trot-line, we are almost assured of a “good catch” with the trail cam.
Now you have finally decided to take the plunge and purchase a trail camera. The choices available are numerous, so you need to narrow your options. Your first decision is to choose between film and digital cameras. This is a no-brainer; digital is the only way to go.
You might be lured into buying a traditional film camera because the cost of the unit is less expensive than a digital equivalent, but the short-term gain in money saved will soon be eaten up by the cost of processing the film. Plus, with a digital camera, you aren’t forced to wait hours, or days, before viewing whatever your camera caught sneaking by.
Another big factor for you to consider in determining which trail cam to buy is the type of batteries it requires. Rechargeable batteries will save you lots of money in the long run. My camera stays out 365 days a year, and I simply rotate two sets of rechargeable batteries. It sure beats the extra cost and time of constantly buying new batteries.
The next choice concerns deciding which image capabilities you need: IR (infrared) or color. IR cameras are usually priced higher than color cameras, and the pictures will not be as detailed as the full-color photos you are used to seeing.
However, the IR models have the advantage of not needing a flash, which some hunters fear may spook deer and cause them to avoid the area where the trail cam is positioned.
The resolution of the camera, expressed in megapixels, is another consideration. The first digital cameras produced were available in the 1.2-megapixel range. You can still buy these cameras, but now you have the option of cameras up to 6 megapixels.
The higher the megapixels, the better the quality of the picture. Higher megapixel cameras give you the ability to zoom in on small sections of the photograph without the image becoming pixilated and distorted. It’s also easier to distinguish one buck from another or discern a deer that is farther away from the camera.
To the novice, it may seem ridiculous that one trail cam costs less than $100 while another sells for $600, but many have learned the hard way that you typically get what you pay for. The reliability of the camera and sensitivity of the sensor improves with price, and you will have to let your budget and needs dictate which camera you choose.
Even though the trail cam has given hunters one of the best scouting tools available, for the most part the cameras have fallen far short of their potential. The trail cam can be a great tool, but like any tool it must be used correctly to receive the full value it has to offer.
Obviously, a trail cam will let you see some of the bucks you have available. Probably the most common tactic among trail-cam users is to put out a feeder and set the camera to monitor anything that comes to it.
Although this is a fun way of getting lots of pictures, it really doesn’t tell you much more than what deer are present. Often the camera gets filled up with picture after picture of birds and raccoons because they will also frequent a corn feeder. This is fun and may serves the camera’s purpose for many, but as a tool the trail cam offers much more potential for those who want to improve their hunting.
If you intend for the camera to help you not only get a look at your deer but also to help you bag a buck, you’ll have to get more versatile. By moving the camera around to different locations, you can get a better idea of which deer are using which trails at what time of day. You can discover where a particular buck is spending the majority of his time. That information alone could be what makes or breaks your hunting season.
One place you might set up your camera is over a deer scrape. Scrapes are like magnets to both bucks and does, and they will serve to concentrate deer moving through an area. You will know exactly where the deer will be, so getting a quality picture of them at the proper distance is a lot easier near a scrape.
Funnels, both natural and manmade, are great places to hunt and great for placing trail cams as well. By putting your trail cam near a funnel, you are able to capture a much larger percentage of the deer moving through an area than if you just set it out in open woods.
Water holes and creek crossings are other good areas to place your camera. Deer will frequent water holes, especially during hot weather, and water tends to be crossed in the same spots for years on end, allowing you to detect where the deer are crossing before they spread out in the woods and become more difficult to predict.
Now that you have decided what spot you will monitor with your camera, you will need to know a few tips to help ensure that you get quality pictures. When at all possible, point the camera toward the north. This will greatly reduce the chance of the camera getting triggered prematurely by the sun. Placing the camera in areas of heavy tree cover will also help prevent the midday sun from falsely triggering the sensor.
When setting up the camera, clear away any weeds, twigs or vines that could sway in front of it when the wind blows. Nothing is more disheartening than checking your camera and finding it filled with shot after shot of a branch, with no animals in the frame.
It is critical to accurately gauge the distance from the trail cam to where you expect the deer to travel. If the camera is set back too far, then the sensor might not trigger and you will miss your shot. Having a deer cross too closely is just as bad since you will only capture part of the deer as it passes by or completely miss it altogether if the camera shoots after the deer is out of the frame.
Cameras have sensors of different sensitivity, so take the time to check your camera’s sensor before placing it out in the field. Simply set it up in your yard and test it by walking past it at various distances to see what works best.
Many cameras allow you to adjust the sensor’s sensitivity to light, and set timer delays, picture resolution, day-only operation, flash or no flash, picture or video along with many other settings. Spending a few minutes reading the manuals and testing in your yard will help you avoid wasted time in the field.
What can you expect to learn from your trail cam? Lots of things, according to Donald Toups, an accomplished hunter and outdoorsman. Toups has a 138 4/8-inch bow kill to his credit, a buck that is listed in the Louisiana Big Game Records.
In recent years Toups has turned increasingly toward trail cams to help track and pattern the deer on his land in West Feliciana Parish.
“I was told by others that the bucks I was getting photos of during the summer would not be there during the hunting season,” he said. “I found this to be partially true. Some stayed, some went and others came.”
Toups also discovered that buck-to-doe ratios are revealed by trail cams, but that even this data can be skewed around feeders.
“I was initially surprised at the buck/doe ratio that I was catching on my trail cameras,” he said. “I was getting about 85 percent buck pictures.
After I started moving my trail cameras around, I realized the reason for this. I was feeding at all my sites by that time, and the does were the first to come visit. After the bucks started coming, they would evidently take over the feed and run the does away. I would catch a doe at the feed, and five minutes later when the bucks came, the doe was gone. When she returned, the feed was gone. The buck/doe ratio on my land was nowhere near what my pictures were telling me.”
Ideally, everyone would like to pattern a buck. To know what trail he is likely to use when you take your stand would be priceless. But even though this information is hard to come by, another almost as valuable bit of information that is much easier to determine is what areas are not being used by bucks. Eliminating where you shouldn’t be is a huge advantage and increases your chances of taking a buck on any given day.
One growing use of trail cams is their capability to help clubs better manage their deer herds. For instance, many clubs have restrictions on what can and can not be taken. Getting actual pictures of individual bucks has allowed clubs to post deer as cull deer that would normally be off limits, and even to designate young but well-endowed bucks off limits, even though they might meet the antler requirements of a legal buck in the club.
“Some things that were nice to catch photos of were the interactions between the deer,” Toups said. “I had one photo of a dominant buck running off another buck, pictures of fawns nursing and even one photo of a fawn attempting to nurse on a buck. I have a picture of a 5-point while I was on the stand 15 yards from him.”
Whether you are looking to zero in on a particular monster or just want to increase your enjoyment by gathering pictures of your herd, trail cameras are almost as much fun as the actual hunting. The knowledge you gain by having another set of eyes in the field 24 hours a day is invaluable and can only add to your enjoyment of the outdoors.