Let Mother Nature tell you where to target specks and reds this month.
Plooop…. Plooop…. Plooop ….. KAH-BUUUSH!Are there any sounds sweeter, or more haunting, than those of a popper merrily going about its way in quiet water, only to be engulfed by some denizen of the deep?
Whether it’s hand-sized bluegill or man-sized tarpon, the anticipation and the actual strike invokes a passion for poppers.
When it comes to poppers for bass and saltwater use, there are more variety in terms of forms and materials than this periodical has space to list. Some can be very realistic but take hours to create. Others are very simple, but lack durability.
Kirk Dietrich of Chalmette is one of the most-highly respected and innovative fly tiers in the nation. Along with his famous Spoon Fly and Rattle Rouser, he’s culminated several methods for creating the Kirk’s Popper, also known as the Perch Float Popper. Dietrich’s philosophy behind this fly is quite simple.
“The end product is arrived with catching fish in mind,” he said. “Sometimes I have catching fish in mind so much that I fish these poppers without even painting them.”
Indeed, the Kirk’s Popper is not only a simple but very durable fly, it’s one heck of a fish killer. With its concave face, stripping it makes a popping sound that attracts speckled trout, bass, snook and other aggressive species.
I’ve had everything from peacock bass to rainbow trout to even black drum and catfish hit this fly.
To make the Kirk’s Popper, you need the following: red and white styrofoam perch floats 1.5 inches long, cigar shape; Mustad hooks 34007 size 2 or 34011 size 4 or similar; superglue, 30-minute epoxy, acrylic water colors, and various utensils.
Before getting started, it’s important to note that poppers like this one are best made in bunches, like six to 10 at a time. You’ll understand why as we go along.
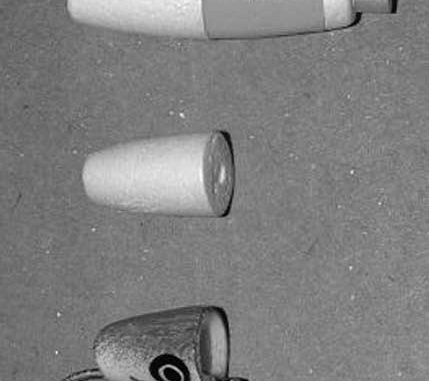
Take the perch float and cut it in half with an X-acto knife, creating two flat-face bobbers. You’ll now have a red bobber and a white bobber.
While the red bobber can be primed and made into a popper, it’s what I use for my “vertically oriented strike indicators” or VOSIs. In fact, the next steps are the same for both bobbers.
Use fine sandpaper to smooth the flat side of each bobber. Then take a cone-shaped silicon-carbide grinding bit, and manually grind out the flat side into a concave face. Do not use a drill, or else it’ll eat away too much of the sytrofoam.
Take the X-acto knife, and cut a slit lengthwise. Slide a strip of fine sandpaper edgewise into the slit, then sand the slit so it gets wide enough to accept a hook.
At this point, the red bobber is now a VOSI. The slit will be used to slide the VOSI onto a leader, where the float stopper will lock it onto the leader about 18 to 24 inches above a weighted fly.
Back to the white bobber. Thread a hook with open spirals so it’s fairly uneven and rough. Next slide the hook into the slit of the bobber, with the cup face up against the hook eye. Using super glue or Zap-a-Gap, secure the bobber to the hook.
Now comes the fun part. I like two-tone poppers, mostly green back and white bottom. To get the green back, soak a small piece of sponge in green acrylic watercolor paint, then press on a piece of aluminum foil to remove saturation. Then lightly press the sponge across the top of the body.
Another trick is to put some netting over the body before pressing the sponge. This creates a lattice effect.
To make the eyes, you want three pencil-length sections of different diameter wooden dowels. Mix black acrylic paint on one piece of aluminum foil. Dip the end of the widest dowel into black, then press gently on both sides of the popper. Let dry.
Then do the same routine using the next smaller size dowel and white acrylic paint. Gently spot the tip of the dowel inside the black “eyes.” Let dry, then repeat once again using the smallest dowel and black acrylic.
To speed this process up, I sometimes use black and white nail polish. However, this is where I take my tying out on the patio. Never use nail polish in an enclosed room.
Making eyes is where “bunch production” works so well. As you finish up one step on the last of a dozen poppers, the first popper is dry and ready for the next step.
To protect the paint job and make the popper more durable, we finish off with an epoxy coat. I use a disposable brush and Devcon 30-minute (waterproof) epoxy. You can coat about six poppers before it starts getting tacky.
The poppers need to be rotated to keep the epoxy from sagging. I use a rotissiere motor and a styrofoam block to make a simple turning device for epoxy flies. You can also purchase turning (drying) motors from Cabela’s and other sources for about $20.
Considering that poppers run $4 to $6 each, a drying motor is a wise investment, and can be used for many other saltwater flies that require epoxy.
Once the epoxy has dried, store the Kirk’s Popper bodies away in your tying box, and as you need them, pull them out and tie on a tail. White and green bucktail, or ultrahair, is the most common choice for tail material.
Give yourself a “popper-tunity” to catch fish with these, and you’ll be glad you did.


")