More and more hunters are getting into the sport of finding shed antlers after the deer season. If you’ve never done it, you don’t know what you’re missing.
Winter is over. Flowers are beginning to bloom. The weather is milder. The days are a little longer.
If you are like most boat owners, you are probably beginning to dream about getting the boat out of the garage and going out on the water for a day of fun.
Before you hook up your boat and head out, you might want to take a little time to perform some much-needed maintenance on your rig. The spring tune-up is one of the most important maintenance services that can be performed on your boat. It is your opportunity to catch the little problems before they become major failures.
Start with the battery. A simple volt meter will indicate if the battery needs to be charged. A good battery will usually develop 12.5 volts; if your battery is less than that, you will need to recharge it.
The volt-meter test is only a preliminary check. A battery load test is the best indicator of the battery’s condition. If you don’t have one of these meters, you may want to take the battery to your local repair shop to have the test performed.
Once the battery is fully charged, clean the battery terminals and wire connections with a wire brush. Corrosion can form on the battery post, and this will prevent the proper voltage transfer from the battery to the engine.
When you reinstall the wires, be sure to tighten the wing nuts with a pliers or wrench. A loose wing nut can lead to costly ignition and charge-circuit system failures.
Moving on to the engine, I like to begin all tune-ups with a compression check. This test is used to gauge the condition of the major internal components of the engine. Check your service manual to see how much compression your engine should be developing. A weak compression reading could indicate the need for a major overhaul of the engine’s power head.
If compression is good, check the ignition system for spark. Be extremely careful when checking spark. The voltage output of the modern outboard is extremely high. If you are not cautious and do not use properly insulated tools, you could find yourself on the receiving end of a serious electrical shock.
If ignition checks good, install a new set of spark plugs and hook up all of the spark-plug wires. Be extremely careful not to cross any of the plug wires when you reinstall them.
Once you have reinstalled the spark plugs, you should replace all fuel filters on the engine and in the boat. Most outboard engines have at least one filter located inside the engine cowling, and many boats also have a larger filter located somewhere in the boat.
Before you change these filters you may want to get a glass jar so that you can drain each filter into the jar, and inspect the gas for any dirt or water contamination.
If you find an excessive amount of trash or water in the fuel you will need to drain and clean the gas tank.
Moving down to the lower unit, the next step in your spring tune-up is to change the lower unit oil. Start with a clean bucket or pan. Remove the oil drain and vent screws from the lower unit. Monitor the oil as it drains out to make sure you don’t have any metal shavings or water contamination in the oil. Metal shavings could indicate a problem with the gears, and water contamination would be an indication of a seal failure. Water is heavier than oil, so if there is any water in the oil, it will come out first when you remove the drain screw.
Once the oil is completely drained, refill the lower unit with fresh oil. After the lower unit oil has been changed, remove the propeller, and inspect the shaft behind the prop to be sure there is no fishing line or other foreign materials that could damage the prop-shaft seals.
Once you have cleaned the shaft, then apply a liberal amount of grease to the shaft and reinstall the prop. The grease is used to prevent corrosion from possibly freezing the prop onto the shaft.
Inspect the entire engine. Grease any pressure fitting you may find for both the swivel housing and the steering/tilt tube. Check all of the anodes on the engine; if they are beginning to corrode, now would be a good time to replace them.
If you should notice any rust while inspecting your engine, get out the trusty wire brush, clean off these areas and apply a fresh coat of paint. You can also spray the engine with a corrosion inhibitor oil to help prevent future rust and corrosion.
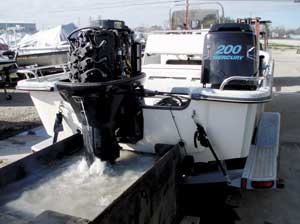
Now it is time to run the engine. In the shop, all I have to do is back the boat up to my test tank, lower the engine in and I am ready to run and test everything.
You can crank the engine up using a garden hose and a flush device to supply cooling water, but there is no restriction on the exhaust and the noise level is much higher so you will not get an accurate check.
The best thing to do would be to take the boat to the water for testing. At the launch, start your engine and allow it to warm up for several minutes. While the engine is idling, monitor it to see if it is running smoothly and there are no abnormal noises.
Check and, if necessary, adjust your idle RPM, and then take the boat out for a short shakedown cruise. If everything checks out fine, then start planning that first day of boating fun.
If you have any questions about your boat send me an e-mail at hanktheboatdr@yahoo.com.


")