
The tool that’s almost all you need
In the early days of automatic fish finder operation, I advised serious anglers to switch to manual mode where they could tune in a much better look at the underwater world. I think that has changed, and I now suggest that fishermen run their units in auto mode and just tweak the settings where they see problems.
You can now go into a unit’s menu and set parameters that help its computer meet your personal preferences and better handle your recreational waters.
Step one is to make sure the unit is set to use the transducer that’s connected to it, and step two is to select the operating frequency or frequencies you want to use.
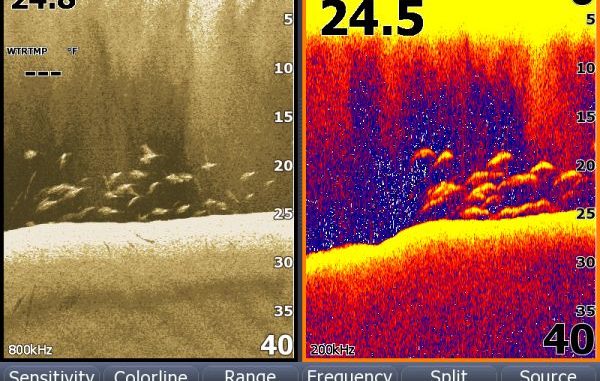
Generally speaking, higher operating frequencies deliver better screen detail but don’t penetrate depth as well. In contrast, lower frequencies deliver poorer detail but penetrate depth much better. This is true for conventional down-looking, high-definition down-looking and side-looking sonar.
Beams generated by lower frequencies also tend to cover wider areas than those transmitted at higher frequencies. The industry’s most-popular frequency for conventional down-looking sonar is 200 kHz because it offers the best blend of screen detail and depth reach. In my experience, it works great down to 200 or 300 hundred feet. I prefer 83 kHz for similar and slightly deeper depths, and 50 kHz for maximum depth reach. Fifty kHz is not a great choice for cruising because it sometimes has trouble staying locked onto the bottom beyond a fast trolling speed.
Many units have specific menu settings for shallow and deep water and fresh and saltwater. Some also allow a maximum-depth setting that keeps the unit from seeking a bottom depth deeper than you care about. If your deepest water is 190 feet, setting the maximum depth at 200 will keep the unit from wasting time looking deeper if it loses its lock on the bottom and searches to reacquire it.
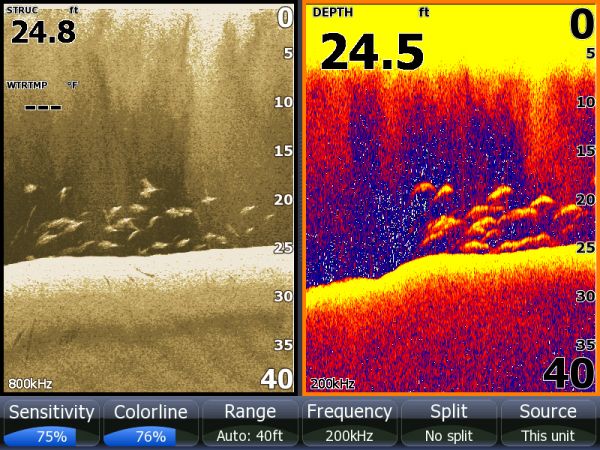
I leave the noise and surface clutter filters at their default settings during my initial setup and adjust them as necessary during each fishing trip.
The daily clarity and temperature of the water and your proximity to other sonar users can require changes in filter settings. I use the lowest filter settings that give me a readable picture with the level of detail I need. Too much filtering makes the screen picture look blocky, reduces detail and eliminates important weak echoes from weeds and baitfish.
I prefer to look through a bit of interference rather than sacrifice critical screen detail.
I set the chart speed and ping rate to maximum while cruising, and sometimes slow down the ping speed while fishing. Sometimes setting different ping speeds for your bow and console sounders can keep them from interfering with each other.
The best colors for screen background and picture detail are subjective; use what you like. I use the default colors and only try other color sets if light conditions make the default setting hard to see.
I leave the screen brightness at maximum, and turn it down a bit at dawn and dusk. When night fishing, I switch to a dark blue background color and turn down the backlight to protect my night vision.
Once the basic parameters are set you, should only have to tweak a few features as you cruise and fish. When you throttle up and put your boat on plane, your engine and boat hull cause enough noise to overwhelm your fishfinder’s screen with interference, but the picture should automatically clear as your hull settles on plane.
If too much noise remains on the screen you can reduce it by turning down the sensitivity or by turning up the noise filter. If I can see the bottom and fish through the interference, I usually leave the settings alone so I don’t have to readjust them again when I stop to fish.
The automatic adjustment that I have to fiddle with most is automatic depth ranging. This setting increases the depth range as you move over deeper water and decreases it as the bottom comes back up.
Most fishfinders I’ve used seem to select a deeper range before they really need to, and then don’t switch back to a shallower setting as quickly as they should. The end result is that the unit selects the 0- to 60-foot range while I’m fishing in 30 to 40 feet of water, and the bottom contour ends up in the middle of the display.
I understand why units are set up this way; most anglers don’t want the screen jumping from one range setting to another every minute. Fish look twice as big on the 0 to 30 range as they do on the 0 to 60 range and that can cause confusion, too.
But any time the bottom contour is in the middle of your screen you are wasting half your display’s vertical pixel count and half your screen detail. I want the bottom contour at the bottom of my screen.
When I’m fishing over a bottom that’s undulating between 30 and 40 feet, I’ll manually set the depth range to 0 to 40 feet.
The good news is that tweaking settings each time you’re on the water “teaches” the unit your fine-tuning preferences, and the more you go the less tweaking you’ll probably need to do.