Giant yellowfin tuna are at this very minute heading to the Midnight Lump. Do you have the right gear to tangle with them?
Each December, anglers from near and far trek to the famed Midnight Lump, or Sackett Bank, located south of Venice to do battle with triple-digit yellowfin tuna, giant mako sharks and other trophy fish. Like a flu pandemic that spreads quickly, when the word gets out that monster yellowfin have made their annual appearance, boats of all shapes and sizes head to this area. Unfortunately, many will have the unpleasant experience of watching others catch fish while they struggle to position their boats due to lack of experience and preparation.
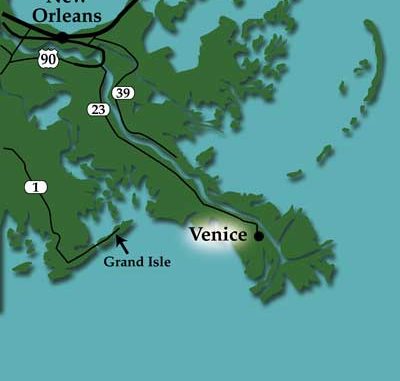
Much has been written about how to catch fish in the waters surrounding this famed area of majestic diapirs, or lumps, that rise from the Gulf floor just 18 miles out of Southwest Pass.
With the help of some of the area’s top charter captains, we will provide a comprehensive list of tackle and gear that is required to properly and safely outfit your “ride” to fish this area, as well as suppliers who stock the items. We will provide anchor requirements and include detailed instructions for setting and retrieving an anchor. The captains will also offer tips to help boaters travel safely to and from the Midnight Lump during the sometimes treacherous winter conditions
Navigation, radar, VHF
Let’s start with the essential electronics and boat equipment: a good 4kw radar, fish finder and GPS are a must.
“There is no substitute for good electronics,” said Capt. Rimmer Covington, who operates a sleek 39-foot SeaVee out of Cypress Cove Marina.
His choice of electronics consists of two RayMarine E-120 displays, RayMarine digital radar and digital sounder as well as two VHF radios.
“Safety is of utmost importance, and certainly comes into play when navigating the Mississippi River and passes,” he said. “During the ‘season,’ the weather makes traversing these waters exponentially more dangerous.”
Capt. Bill Delabar agrees. “As the captain, you are responsible for not only the success of the trip but also the well-being of the crew and the vessel,” he said.
Fishing the winter season out of Venice poses additional challenges for the captain and crew, including low water temperatures and fog. Delabar, who captains the 32-foot Twin Vee Anger Management, stresses these two prevalent Lump season factors demand a considerable degree of respect.
“It is very important that the operator of the vessel have decent forehand knowledge of the waterways that will or might be used so that in the case of white-out fog conditions, the captain can make sense of what the electronics are telling him,” says Delabar.
He recommends making several dry runs of each of the passes you plan to use during clear, daylight conditions to get a good feel for the area.
Delabar also recommends that during these dry runs, adequate map trail or waypoints are logged to make navigation with electronics easier on the operator when it is foggy or dark.
Lastly, Delabar stresses it is critical to have a comfortable understanding of how to use your electronics and to know their limitations.
“Try running around for a while in the daylight to see how your radar picks up buoys and channel markers so you’ll know what you’re looking at when you really need to,” he says.
There is extensive ship and workboat traffic on the lower Mississippi River and its passes, and it is critical that boaters switch to the proper radio channels, and heed requests from other vessels when traversing these areas. These are:
• Channel 13 in the passes (Tiger, Red and The Jump);
• Channel 67 in the Mississippi River and Southwest Pass;
• Channel 16 for Coast Guard and any type of distress (larger vessels monitor channel 16 full time; also switch to 16 when running at night);
• Channel 68 is the open recreational channel.
In the passes, whenever possible, pass left to left when passing head on (referred to as “one whistle” by commercial vessels ). Two whistles is the opposite, right side to right side when passing head on, and right side to left side when overtaking.
When viewing channel markers, always remember the phrase “red, right returning.” The red markers should be kept to your right when running inbound in the river or passes.
As a reminder, it is recommended that boaters always file float plans with friends or relatives, and leave a copy visible on the dashboard of their vehicles before leaving the dock, especially during Lump season.
Safety equipment
Capt. Kevin Beach on the 30-foot Gravios Pale Horse emphasizes that safety equipment should be easily accessible including PFDs, EPIRBs and other required Coast Guard equipment. More importantly, he says, make sure your crew knows where they are located and how to use them before leaving the dock.
In addition, check and replace flares and recharge fire extinguishers. Make sure your first aid kit is fully stocked.
A powerful Q-beam is also helpful for locating buoys or passes at night. The rechargeable 400,000-candle-power model is a good choice.
Anchor set-up
Of the professional captains surveyed, most preferred a plow- or claw-style anchor over the Danforth-style due to the fact they are quick-setting.
“The plow-style anchor also offers a safety release in case of snags, which are common when fishing the Lump,” said Beach.
Capt. Tommy Pellegrin had the only opposing vote, choosing a Danforth anchor to secure his 36 Gravois Reel Life.
“I use a 22-pound anchor with 40 feet of chain, and I have never drifted. Is it overkill? I think not, as I like to fish instead of fighting with my anchor,” says Pellegrin.
It is his opinion that most boats 30 feet or less can get away with an 18-pound Danforth and 20 feet of ¼-inch chain, but he suggests bringing an extra 10 feet of heavy chain and shackles to secure it just in case.
Delabar and Beach stress that the single-most important piece of the anchor set up is 30 feet of heavy chain. Suggested size is ¼- to ½-inch, which is more than sufficient for most boats.
“On most days, you won’t need the extra size chain, but on the days you do, you would pay a million bucks for it, not to mention avoiding screwing up those fishing around you,” Beach said.
The anchor is attached to the 30 feet of chain with a heavy stainless-steel shackle, and then 600 feet of rope completes the set up.
Delabar compiled the following list to help anglers shop for the proper anchor set-up:
• 600 to 800 feet of nylon anchor rope (5/8- and ½-inch are the most popular);
• 30 feet of ¼- to ½-inch heavy galvanized anchor chain;
• Medium- to large-sized inflatable poly ball (good idea to put boat name on your anchor ball).
• 4- to 5-foot section of braided heavy-duty rope
• Stainless-steel spring hook snap (1/2-inch is a good size)
• Stainless-steel retrieval ring;
• Several shackles that are sized to fit your anchor and chain (purchase spares!);
• Plow or claw anchor one size larger than recommended size/weight for your vessel length;
• Large plastic garbage can with holes drilled in the bottom for drainage.
Gaffs
A minimum of two 6-foot gaffs are mandatory. Beach suggests adding a spiral wrap of non-skid tape along the shaft to help ensure a firm grip. Additionally, a flying gaff or harpoon can be helpful when tangling with monster mako sharks or 200-pound yellowfin tuna, Delabar suggests.
Covington prefers two 6-foot TopShot gaffs with a 6-inch gap and one TopShot flying gaff.
One caution when using a flying gaff or harpoon: You must make an accurate shot.
Beach guided angler Lane Foil to the Gulf record 765-pound mako in January of 2006, so he’s familiar with what it takes to get a big fish in the boat.
“The hardest and most important part of landing a fish of a lifetime is to remain calm, especially at the gaff,” he said. “Most of the time, you will have only one shot, so make it count. Just as in deer hunting: You see the buck of a lifetime in your field. You don’t just throw the gun to your shoulder and haphazardly pull the trigger. Instead you try to relax and have a well-placed shot. It is the same concept with a gaff — one shot, one kill.”
Rods, reels, tackle
Although yellowfin tuna are the most sought-after species, there are opportunities to target wahoo, mako shark, blackfin tuna, amberjack, vermillion snapper and various oddball bottom species on the Lump. The following is a list of what you’ll need:
• lever drag, high capacity reels with stand-up, stout fishing rods (Tiagra 50 and 30 LRS are ideal, but any 30- to 80-pound lever drag outfit will do);
• multiple fighting belts for multiple hook-ups, which are common. BRAID or Alutecnos belts and harness systems that have some type of back support are ideal;
• safety lines to keep rods and anglers from going overboard;
• a large selection of hooks for the days when kingfish and sharks are around (Frenzy 5/0 to 8/0, Mustad 6/0 to 7/0 39950BL, or your favorite circle hook);
• fluorocarbon leader 50- to 80-pound (Seaguar and Frenzy are good choices);
• vertical jigs; the Lump is a great place to experiment with jigs since as there are so many fish around, plus it keeps at least one angler busy;
• One quality bottom setup for amberjack and vermilions (solid glass, stiff rods are best, with a decent reel, spooled with 100- to 250-pound PowerPro is ideal);
• kite setup for live baits and Ballistic Flyers (great for maximizing your potential and getting an extra bait in the water);
• 3-4 trolling rods for wahoo (can double as tuna rods);
• an assortment of trolling plugs (MirrOLure MR111 in pink, Yo-Zuri Bonita purple/black 5½-inch, Mann’s Stretch 30 chrome/silver);
• ballyhoo rigs when the water is blue;
• 80- to 140-pound hardwire (to rig wahoo baits);
• SPRO 130-pound swivels;
• 125- to 200-pound mono leader for bottom fishing;
• assortment of 16- to 24-ounce weights for bottom fishing;
• heavy-duty spinning rod and reel spooled with at least 300 yards of 80- to 100-pound PowerPro.
• assortment of poppers (Frenzy Angry poppers are heavy and provide the best range when casting into the wind to busting fish);
• rubber bands for attaching weights and 8- to 16-ounce bank weights.
Bait
Frozen bait is the mainstay of Midnight Lump fishing, and pogies are at the top of the menu. Many charterboats will not leave the dock with less than 300 pounds of bait consisting of threadfin, squid, pogies or Spanish sardines.
Live bait is added insurance, and usually consists of medium-sized hardtails, which may be caught on sabikis, or live mullet, which can usually be cast-netted in the river near the Jump or Head of Passes.
Bonito makes excellent red-meat chunks and chum, and if you are lucky enough to catch a skipjack tuna, you’ve hit paydirt.
Additionally, Covington has found great success with Mustad’s UltraBite fish attractant applied to chunks or squirted into the chum slick.
Knives, boards, churns
It is time to slice and dice the bait buffet, so make sure to pick up the following items:
• Several 9-inch serrated sharp knives such as the Dexter Russell utility knife (they always seem to go overboard, so pick up extras);
• Cutting board;
• Large “Chum Churn” (nothing works better, according to Covington);
• Utility scissors;
• Rubber coated gloves;
• 5-gallon bucket for thawing frozen bait.
Beanbag chairs
No more soggy bottoms! Marine-grade bean bags offer comfort and durability, and come in a number of colors and sizes.
E-Sea Rider medium round size is a good choice (www.e-searider.com).
Outerwear, boots, etc.
Most of the Lump season is cold and wet, and hypothermia is possible, so dress accordingly. Layers of warm clothing are a must, but they are useless if the outer layer is not sufficiently waterproof.
One of the most popular “Lump wear” products is the CoFish bibs and jacket. They are available in dark green and international orange. Jackets offer either a normal sleeve or the new model with neoprene cuff, which prohibits water from rolling down your sleeve when you raise your arm.
Royal white rubber boots, or “Cajun Reeboks,” complete the outfit, and are considered to be the most comfortable. They keep your feet dry and toasty, and are slip-resistant.
It is also a good idea to bring extra clothing, and stow it in a dry bag in the event you do get wet. There is nothing more miserable than spending 10 hours on the Lump shivering.
A good pair of leather gloves comes in handy when it is time to pick up the anchor. Not only do they protect from abrasion of the rope, but at certain times during Lump season, Portuguese man-o-wars are plentiful, and their broken tentacles become entangled in the anchor rope and deliver a nasty sting.
Setting the anchor
There is much more to anchoring on the Lump than simply pulling into the middle of the pack and tossing the anchor. Wind, current, surrounding boats and your geographic location on the Lump are all major factors that seriously impact the success of your outing.
Delabar says although it usually pays to be first to arrive, there is much to be learned from the crews that are already hard at work. First, take note of the direction that the anchored boats are facing, especially the boats that are most like your own, since wind and current can affect various hull types and boat styles differently.
As a rule, all the anchored boats will be facing almost the same direction. This will provide you with a good idea of where you will need to deploy your anchor to 1) stay away from vessels that are already on anchor while 2) giving yourself the best patch of open water to fish once your anchor line comes tight.
Although the wind is the prevailing force that keeps all the boats facing the same direction, it does not mean the fishing lines are coming straight out the backs of the boats. Pay close attention to VHF radio traffic (channel 68) as you approach the Lump. It is a good idea to radio a friend or fellow boater who is already set up to determine which way the current is going before setting your anchor.
Example: If the current is flowing port to starboard, make sure there is plenty of room out the right side of your boat and that you have enough space between you and the next boat to accommodate any style of fishing. Dozens of good fish are lost each year to other anchor lines, so keep that in mind when shopping around for your spot.
Always attach the tag end of the anchor rope to a cleat before throwing any expensive ground tackle over the side.
When setting the anchor itself, try to hold the boat stationary until the anchor hits bottom. Try to lay the anchor out exactly as it will sit instead of just dumping anchor, chain and rope overboard in a big mess. Once your anchor hits bottom, use your engines to pull the boat in the direction you plan to sit while applying light, steady pressure to the rope as it pays out. This can be easily accomplished by putting a bend in the line around the front or waist cleat as the line strips out of the plastic garbage can.
As you near the end of your line, you should feel the anchor starting to hold. At this point, increase the pressure to make sure the anchor is grabbing and to force it to dig in a bit more. Delabar carries 800 feet of anchor line and always deploys 600 feet to make sure it will hold for the duration of the fishing day.
Retrieving the anchor
After a successful day of fishing, it is now time to pick up the anchor. Delabar starts by looking at his compass. This will show the exact heading he needs to travel toward the anchor to avoid damaging his equipment. If using a danforth-style anchor, he says this step is especially important to avoid bending the yoke, which is the weakest part, during retrieval.
He spreads the load more evenly by using at least two cleats to lessen the stress on his boat and in case he has a snag or other problem.
With the boat still sitting at anchor, attach the poly ball to the anchor line using the stainless-steel retrieval ring and spring hook snap. Leave the anchor rope loop fastened to the bow cleat, put the motors in gear and accelerate slightly to make some headway.
Turn just enough so as to clear the anchor rope and poly ball while always keeping them in plain view to avoid entanglement in your wheels.
Once the anchor rope is safely behind the motors, slow to idle speed, grab the rope and walk it back to the waist cleat, make one wrap; continue to the stern cleat and make one wrap there spreading the load along one entire side of the boat and three cleats.
Look at your compass and steer to the heading you noted while still on anchor, keeping a steady pace while the poly anchor ball and ring slide along the rope to retrieve your gear. It is a fine line between having enough momentum to dislodge your anchor from a firm set without damaging your gear.
On Delabar’s Twin Vee with dual 250-horsepower Yamahas, it is somewhere between 1,000-1,500 rpm.
If successful, steer toward the anchor ball bumping the engines in and out of gear as you take up rope and stow it neatly into your plastic garbage can as you go.
There will, of course, be times when you cannot retrieve your gear in a nice straight line. When this occurs, try to retrieve as much rope as possible before changing directions. As you approach the anchor ball, turn the boat, and try to put it downwind of the rope keeping it clear of your wheel, then quickly re-cleat the line to your stern and make a turn around the line to clear the motors.
Once certain the ball and rope are clear, accelerate to plane your anchor up again, and repeat this process until you have successfully retrieved your gear.
Before heading in, slide the plastic can to the back and secure it to avoid accidents on the ride in.
If you practice and master these techniques, you will have more fishing time to hopefully fight and land that fish of a lifetime on the famed Midnight Lump.
For more information, contact Capt. Bill Delabar (504-723-0742), Capt. Rimmer Covington Jr. (601-951-3891), Capt. Kevin Beach (504-451-3886) or Capt. Tommy Pellegrin (985-851-3304).

")