Intercept trout as they make their way to the big bays on the east side of the river.
I have been writing columns for more years than I care to admit. In all those years, I cannot remember a single column that generated as much reader response as the one I wrote about flushing your engines. I am pleased and flattered that so many of you took the time to e-mail your questions about the topic.
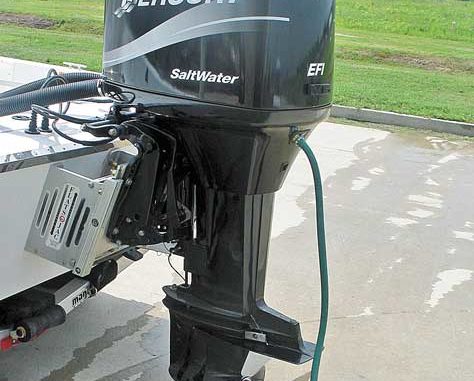
The majority of the questions seem to be about the newer outboards that are equipped with a flushing hose or port near the power-head of the engine. In my column, I did not mention this flushing port, which is standard equipment on most new engines. Many of the boat owners who responded wanted to know if the flushing port was better than the ear-muff style flusher that I described in the article.
I decided to do a little research. I contacted Sid Brady at Bent Marine, and he supplied me with owner’s manuals for Honda, Suzuki and Yamaha outboards. I also contacted my friends at Bayou Outboards, and they supplied me with a copy of the Evinrude E-tec owner’s manual. I was surprised at just how little there is in any of these manuals about flushing engines.
The first manual I looked at was from Honda for engine models BF135A and BF150A. Their manual states: “Thoroughly clean and flush the outboard motor with fresh water after operation in dirty water or salt water.” I am not sure what constitutes “dirty water.” I would rather see you flush your engine after every use regardless of the water the boat was in. Honda recommends using the flush port connector on the side of the engine for flushing. They also recommend that the emergency-stop switch clip be removed so there is no chance of the engine starting while anyone is standing near the propeller.
Their instructions are pretty simple. First disconnect the flush port connector, then connect the garden hose to the flush port connector, turn the water on and allow it to flow through the engine for at least 10 minutes. After you have flushed the engine, remove the garden hose and reconnect the port connector.
The second manual I was given was for a Suzuki DF200, DF225, and DF250. Suzuki recommends flushing your engine “after operation in muddy, brackish, or salt water.” They further warn that, “If you do not flush the water passages, salt can corrode the motor and shorten its life.”
The Suzuki owner’s manual lists two different methods of flushing your engine. The first method is to purchase an ear muff-style flusher, and the second is to use the flush-plug adaptor on the rear of the engine cowling. With the ear-muff flusher, their recommendations include turning the garden hose on to obtain enough water flow so that plenty of excess water flows out from around the rubber cups.
For safety they recommend removing the propeller before starting the engine. Run the engine at idle speed for several minutes, and then turn the engine off and remove the hose and flusher.
If you would prefer to use the second method of flushing your Suzuki, you simply remove the flush-port plug from the rear of the engine, install the garden hose into that port and turn on the water. With this method, you do not start the engine; you simply turn the water on and allow it to flow for at least five minutes. When completed, remove the hose and reinstall the plug.
The next manual I checked was for Yamaha models F250 and LF250. The manual states: “Perform this procedure right after operation for the most thorough flushing.” It does not specify if engine temperature has any effect on the flushing process, but if it does, I wonder if they have considered the time it will take for you to trailer your boat from the boat launch to your home. Surely the engine will have completely cooled down during the trip home.
The flushing instructions state that “after shutting off the engine, unscrew the garden hose connector from the fitting on the bottom cowling.” Attach the garden hose, turn it on, and allow the engine to flush for approximately 15 minutes. “CAUTION: Do not perform this procedure while the engine is running. The water pump may be damaged and severe damage from overheating can result.”
The last manual I researched was for Evinrude E-Tec models 115-200 hp. Their instructions are fairly simple: “If desired, the outboard can be flushed after each use on a trailer or at dockside while it is vertical.”
Step 1 is to place your engine in an area that has good drainage. Step 2 connect the garden hose to the flushing port. Step 3, “Turn on the water. It is NOT necessary to run the engine for good flushing.” The final step is to leave the engine vertical until all water has drained from the power-head.
Evinrude is the only manufacturer that stated in its manual that you do not have to run your engine in order to flush it. I have always felt that running my engine with the ear muff-style flusher was the better method because once my engine achieved operating temperature, the thermostats would open and I would have a better flow of water through the entire cooling system. Apparently this does not apply to Evinrude.
If you can find the original owner’s manual that came with your engine, I would encourage you to make the time to read it thoroughly. I think you will be surprised at the amount of information there is in one of these little books. Your local dealer may be able to order a replacement owner’s manual for you if needed.
If you have any questions about your boat, motor or trailer, please e-mail me at: theboatdr@yahoo.com.