Dear Capt. Paul:
I learned how to plot a path with waypoints on Google Earth. The problem is I am unsure which format to use so it will work with my GPS.
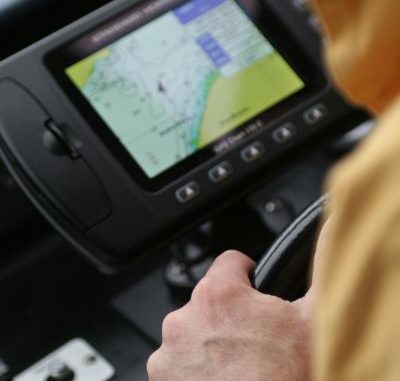
I have a month-old Garmin 547xs. Does anyone know which format I am supposed to use? If needed I can list the options that GPS Babel gives me.
The Truck Man
Capt. Paul’s response:
I’ll get to the heart of your question, but first I must offer a suggestion.
I know that you requested info on how to transfer a “path” or “track” — and certainly you can do that — but it would be far better to install the data in your new GPS unit as a route.
A “path, track or trail back” feature is designed to be only a temporary route that records the track in a fashion that usually replaces the first part of the track back when all of the track-back memory is used. It is called a wrap method, much like a fan belt traveling around a pulley; after using all of the memory, it starts over again from the point where the memory ran out.
To make a permanent record of your route, you must actually make and save a route, which is made up from a series of waypoints that the GPS unit connects by a straight-line course. It assumes you can navigate from one waypoint to another, to another, etc.
In addition, some units with the proper mapping software will design the route using existing waterways, much as an automobile GPS unit would do using roads. I prefer to designate my own routes, as the software does not know my boat’s requirements.
Start from your launch. Mark and save it as a waypoint, and then go to the first turn in your course, and mark and save it as your second waypoint.
Then go to the next course change, and mark and save it, then to the next, and the next, and the next until you reach your destination.
Now, go to the route function and compile these waypoints into a route. Name and save the route.
You will then have a permanent (if there really is such a thing) record of your voyage that you can summon and use to navigate again.
In navigating the route with our GPS unit, you can select the Map, Highway or Compass page to guide you through the route.
As you reach one waypoint, the course and direction to the next one will be provided. The unit will give you the distance and courses from one waypoint to the next, and even an expected time of travel or arrival.
To return back to the launch from your final waypoint, simply invert the route and navigate the courses back to the beginning.
Using the path of track feature to steer a vessel will cause you to have an ever-increasing path line on the screen. That line will become thicker and thicker with each use.
In addition, it causes you to have to constantly look at the GPS screen.
And the unit will only store a very small number of tracks, whereas that unit can accommodate 100 different routes.
With that out of the way, here is the information on the how to accomplishment the data transfer.
The Garmin website for the unit states that “(i)f you have waypoints, tracks or frequently used routes stored on another manufacturer’s GPS product — or on a Garmin handheld device — now it’s easier than ever to transfer those items to your new Garmin chartplotter via industry-standard GPX software formatting. GPX is an open, standard format for GPS data exchange across platforms and applications. With this easy-to-use interface technology, Garmin has taken ‘no waypoint left behind’ to a whole new level of trade-up convenience.”
The newer .gpx-formatted data files are an effort to have one type of data file for the industry. However, some newer Garmin units require a data file to be written to a specific protocol Garmin calls an “.adm“ file.
I don’t believe the GPS Babel program has a conversion to an .adm file format, but you can try the Babel conversion to a .gpx file format.
But, don’t despair, there is a way.
Before actually trying to write a file from a Garmin data transfer program to a spare data card, you must first place the memory card in the GPS unit and turn on the unit. I suggest you do any function with the unit — simply changing a screen page will do. This procedure causes the GPS unit to install a code on the card that is recognized by the Garmin program in your computer and later again by the GPS unit. Without doing so, the GPS unit will not accept the data information.
This is a must in trying to do data transfers. Trying to use an existing map data card for the transfer could overwrite existing map images, thusly ruining the card.
First, save the Google Earth data to a file; I suggest saving it in the Google .XML format. I save my data to a folder I named “GPS” with a sub folder for each area I fish and hunt.
Then, using one of Garmin’s data-transfer programs, transfer the data first into the data program and then onto a spare data card.
Garmin offers a free data-transfer download program on their website called Home Port. I strongly recommend you install the program in your computer; it will save you time and effort in future transfers to and from the GPS unit and your computer. It will allow you to backup all of the waypoints, routes and tacks in your GPS unit to a file in your computer or on a thumb drive.
Garmin also provides a program for land use called Base Camp. Either will work, but the Home Port program is designed for marine type units. Both are available at buy.garmin.com/en-US/US/prod64242.html, and is available for both Windows and Mac systems.
This program allows you to install a Google file into the program and then onto a data card as an .adm file. Once installed in the Garmin program, click on the File icon and import the file to the folder where you saved the Google .XLM file.
All of Google data will appear in the Home Port program.
Place the spare memory card in your card reader. Then select the small icon at the top left of the screen that indicates two small GPS units. One is send to a device and the other is receive from a device. Select the transfer-to option and a window will show the GPS model and serial number that was written on the card.
In that window you will have an option of transferring it directly to the unit or to the spare data card. If you have the unit connected directly to your computer, select that option. If it is not, select the option that writes it to the data card.
One word of caution: When using the settings in your GPS unit compared to the options in the Google Earth program, be sure that the datum agrees.
Let me explain: My information is that Google Earth uses a EGM96 Geoid to display their Google Earth programs. I believe the Google Earth images are corrected to use WGS 84 datum.
So if that is the datum that you use in your GPS unit, simply enter the Google coordinates into your unit. Check the position format to be sure they agree. You can either change the position format (location) in your GPS unit, or you can change the Google Earth display by going to the TOOLS/Options link at the top of the program and select what ever position format you normally use.
So, if you are using your GPS unit in a relative flat area, such as Louisiana, I would assume the figures are fairly accurate. However, if you are using the WAAS feature in your GPS unit in order to get the 3-meter accuracy via the differential system, your position via Google might only be to a position accuracy of 20 meters. Your WAAS-activated GPS unit will produce a more-accurate position fix on the actual position.
I would use the Google info but with suspiscion. When you get to the actual location, you should use your WAAS-activated GPS unit to refine the actual or true position.
Capt. Paul
")
