Where in the world did the summer go? Here it is August, and the respective opening days for SEC football season and hunting season are just weeks away.
Regarding the latter, now is the time to begin thinking about and preparing for the upcoming hunting and trail-camera season. Time is short and the to-do list is long, so we all need to shake off the rust and get ourselves in gear.
Your to-do list should include things like cleaning and servicing your trail cameras, repairing what’s broken, buying whatever is needed, stockpiling camera batteries when you find them on sale and putting together a functional trail camera kit bag.
Unfortunately, since we are still embroiled (no pun intended) in the sticky heat of summertime, there are also many things you can begin doing in the field to give you a leg up on opening day.
In last months installment of “Happy Trails” we touched on the where, what and how of basic trail camera use.
Now granted, many casual trail camera users are perfectly content to place their cameras pretty much anywhere and hope for a few buck pictures. I was the same way years ago after I received my first trail camera as a Christmas present.
Knowing what you have
But, with a little extra forethought and trouble, the results can be so much more.
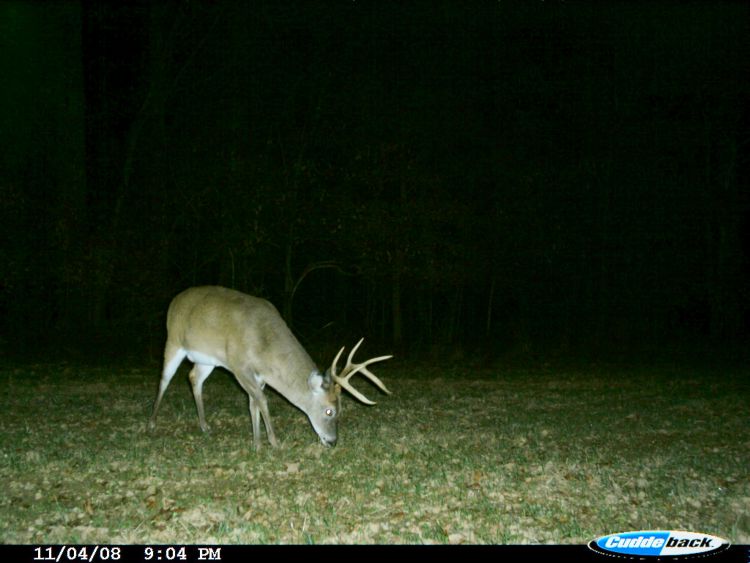
For great results, a web of trail cameras should be treated like a military surveillance network. If your goal is to bag a trophy buck and you want to go beyond just blind luck, you will first need to know if a worthy buck is actually using your property.
If so, what are his habits and where are his preferred travel corridors?
This is where a properly setup of trail cameras can be solid gold.
You might initially have to troll for pictures around such traditional locations as food plot edges, mineral licks and feeder sites.
But after locating and confirming a target buck’s presence, you will need to move some cameras out to travel corridors to nail down the deer’s preferred routes and find the best places to spring an ambush.
Let’s now look at a series of steps that might be employed to bag a hypothetical buck.
The steps you should take
Start your scouting mission in the comfort of your own home by poring over satellite images and USGS topo maps — hard copies or online — to determine generally where the most-likely spots are to initially place your cameras.
Good areas would be where a buck has a balance of bedding cover, prime food sources and water, without having to travel more than 200 or so yards.
The next step would be to go afield and scout your targeted areas carefully to determine precisely where to place surveillance cameras.
You might want to start closer to a feeding area and work your way toward the closest potential bedding and escape cover, looking for buck sign and faint trails.
Ideally, you are starting this process in the preseason, when disturbance and noise are at a minimum, and targetable bucks are more relaxed and prone to habitual routines.
If this is the case, after camera activation you might want to wait up to two weeks before making the first memory card change-out visit to keep scent and disturbance to a minimum.
Be sure to have good, fresh batteries and high-capacity memory cards in place.
If your cameras have the capability for multi-pic bursts, set them to take, say, three to five pics over something like a 10-second time frame. This will usually be sufficient to see a buck’s direction of entry and exit from a camera’s field of view.
Such a sequence of photos taken in the evening should point you to his bedding area.
Saving time
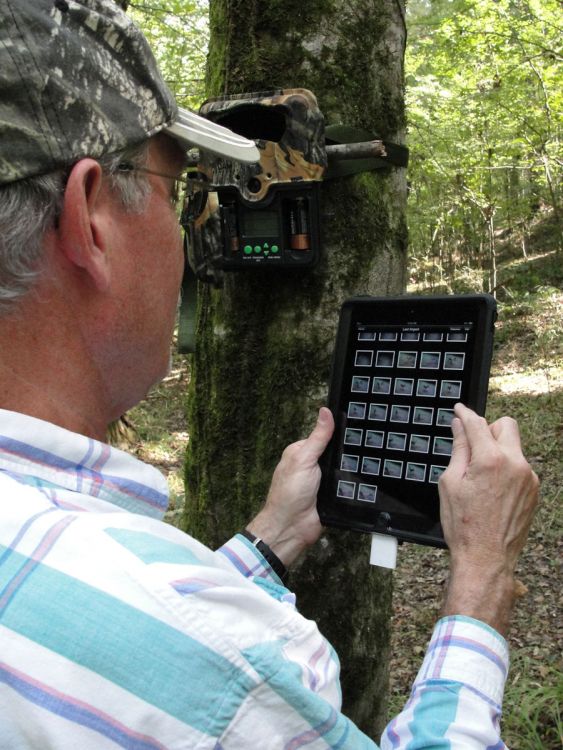
A critical time saver is checking your camera cards at each surveillance site by way of a card reader or iPad. If you don’t see a worthy buck, you can go ahead and move the camera to a new spot without delay, and with a minimum of disturbance and scent.
If you do find a targetable buck on a memory card, the next logical step can be a little tricky — but if you dare, move your camera about 40 yards or so toward the indicated bedding area and wait another week or so before checking the results.
As long as you are continuing to get pictures of a target buck, follow this sequence until you are satisfied that you have the deer pegged or until you are afraid to move any closer to the buck’s hidey-hole without risk of disturbing him.
By going to all of this trouble and by carefully studying the resulting pictures, you are literally peeling back the layers of the onion and revealing the best locations, times and conditions to ultimately get a target buck into your sights.
The post “Have your sights set on a buck before the season even starts” first appeared on MS-Sportsman.com.

")