Whether your boat is primarily a freshwater fishing craft out for a rare day in the salt or is bobbing in brine full-time, there is a post-trip task that can’t be overlooked — the freshwater flush. The salt suspended in the water that recently floated your boat — and cooled its engine — is hazardous to your rig’s health. Long after the water has drained or evaporated, the corrosive chloride particles left behind will degrade any metal they come into contact with.
The most vulnerable areas of your rig are the ports and passages inside your outboard or sterndrive engine, where the saltwater was circulated by your water pump and impeller to keep the engine’s internal workings cool.
Fortunately, the salt water that remains in your engine’s cooling system after it has been shut down, and any salt deposits that may already be forming, can be rinsed away with fresh water. The “flushing” process directs fresh water into your engine’s cooling system to displace the salt water and wash away any potential for deposits to form.
You can flush an engine on a boat that is on a trailer or in the water at the dock; it’s important that you read your owner’s manual to learn their recommendations regarding both.
For example, some manufacturers recommend the engine be tilted fully down during the flushing process, while other manufacturers of engines with horizontal-cylinder configurations recommend that the engine be in a titled position to allow the water to reach the entire powerhead.
There are also flushing bags available that are filled with fresh water, fitted around the lower unit and used while a boat is in the water or on a trailer.
Regardless of the recommended position of the engine, it is important that the rinsing process be done as soon as possible after the engine is stopped for the day and before the water has a chance to evaporate and leave the salt behind.
With most engines, if you begin the flushing process while the engine is still warm, the thermostat will be open to allow the entire cooling system to be accessed and rinse right away; if you wait until the engine cools down, you may have to operate it for several minutes with a freshwater flow before the engine warms enough to open the thermostat for a thorough flush.
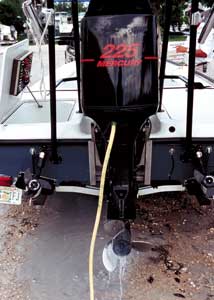
Using a garden-style hose connected to a freshwater source, you attach the male end of the hose to a threaded flushing port built into the engine by the manufacturer or as an after-market accessory, or to a portable flushing device commonly referred to as “ear muffs.”
The muffs place a flexible rubber cup over each the engine’s water intake port on the lower unit; one cup has a threaded fitting that attaches to the garden hose to direct the fresh water into the intake.
With either type of flushing device, you simply introduce a flow of fresh water to the engine’s cooling system. With some newer outboards that offer a built-in flushing port, you do not need to have the engine running to circulate the water; gravity, water pressure from the hose, or both, do the job of getting the water to and through the cooling system.
On other engines, or when using ear-muffs, you need to start the engine and operate it at idle speed to allow its impeller to draw and circulate the water into and through the system, replacing any salt water that remained along the way.
Early in the process, you need to make sure that the water is circulating freely by checking that water is exiting the motor’s jet (“pee”) hole or exhaust port. While doing so, note the water’s temperature; if it feels hot to the touch rather than simply warm, or is not flowing in a strong stream, it may mean that something is clogging the cooling system or that the impeller or water pump is failing.
If it is flowing strong and steady, check the water by wetting a finger and touching it to your tongue; allow the engine to flush for at least a minute after there is no salty taste detected in the outflow.
The flushing process should continue to other areas of your boat and motor to eliminate salt water and the damaging deposits it leaves in its wake. Remove the engine cover, and look to see if any saltwater spray has breached it via the air intake ports. Wipe off any dampness or deposits you find, and coat the area with a light oil such as CRC or WD-40.
Rinse any metal fittings and surfaces on the outside of the boat and motor that might have been exposed to the brine. Combining the rinse with a cleaner made for the surface being washed will help remove the salt and any other build-ups that have formed. A coating of wax or light oil after the cleaning will offer future protection from the elements and leave your rig ready to tackle that next fishing trip.