 While the pickle is cooling, prep the hide by tacking it fur side down and spread open on a sheet of plywood set on sawhorses. It takes about 20 nails to do the job. Be sure to tack the tail open. With a pressure washer of at least 2,200 psi and a fan")
 Untack the hide from the plywood. Use a small pair of scissors to trim any meat and fat from around the nose, eyes and ears.")
 Wash the hide with generous amounts of dish-washing liquid and water to remove any dirt, blood and debris. Apply soap to both sides of the hide, work it in and then rinse thoroughly under running water to remove all soap.")
 Hold the hide by the nose and squeeze out as much water as possible with the other hand, moving downward.")
 Move the pickle into a plastic bucket. Spread the hide to make sure it isn’t stuck together anywhere, and add it to the pickle. Check the pH the next day to be sure it is lower than 2. The pickle must be kept above 55 degrees.")
 The hide may be removed at 48 hours (72 hours for deer, otters and other thick-skinned animals). Wash it thoroughly with water, and put it in a neutralizing solution made up of 1 tablespoon of baking soda per gallon of water. Allow the hide to soak for")
 Remove the hide from the solution, wash it again and knead the water from it. Spread the hide on a working surface, hair side down. Use scissors to open the front leg holes so the hide will lie flat. Dab off any excess water with a rag. Drizzle Deer Hu")
 Set the hide aside, fur side down, in a protected environment overnight or until the hide begins to dry. When drying is well-progressed, break the hide to soften it by pulling it across a firm edge, such as a chair back. A chair with a ball on each sid")
 The hide should be broken every day for three or four days. Sanding with coarse sandpaper should be done in conjunction with breaking the hide. Once the hide is softened to the desired degree, the tanning process is over.")
 The hide may be trimmed to make it more symmetrical. Comb the fur against the grain with a coarse fur grooming comb (available online) to fluff the hair up. A fine grooming comb may then be used to dress the fur.")
Learn how to tan hides of coons, deer and more
George Ricks doesn’t end his coon-hunting experience when the dogs are put away. He continues by tanning the hides.
“Tanning gives me a chance to get closer to wildlife,” Ricks explained. “I get satisfaction from not wasting any part of the animal. When I was a kid, I was interested in trapping. I wanted to learn tanning, but instead sold my furs (untanned) to a buyer. I started tanning hides two years ago. I went on the internet and found a lot of versions of tanning.
“The old-timers would use the brain tanning method. They would salt the hide, then make a paste of the animal’s brain and rub it into the skin. A week later it was tanned.”
He doesn’t go that route.
“What I do now uses an acid pickle that puts the hide through a low acid solution,” Ricks said.
Besides tanning hides for personal pleasure, the hunter also displays them at events, auctions them at National Wild Turkey Federation events and gives them to friends.
He will tan almost any hide.
“I even pick up road kill,” Ricks said with a laugh. “If the animal is still limber and it’s a cold night, it’s still good.”
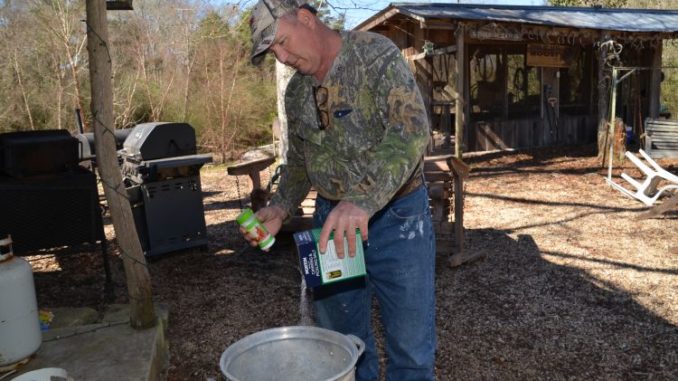
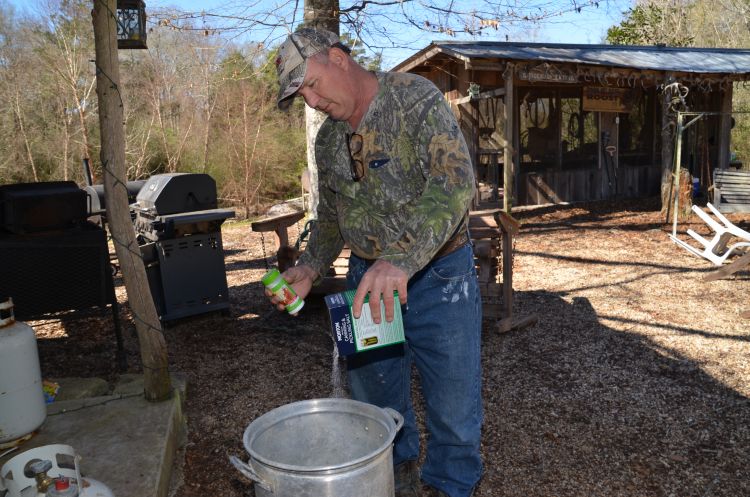
Every hide must be “pickled” before tanning, using 1 gallon of water per hide.
Items needed for pickling include salt, citric acid and pH test strips. Citric acid can be found in the canning and jelly section of any grocery.
Ricks buys his pH test strips online from Indigo Instruments.
After he skins a coon, here are the steps to a properly tanned hide:
1) Make the pickle by adding at least 1 pound of salt and 3 ounces of citric acid per gallon of water. Heat the water to dissolve the salt, and then turn the heat off. Check the pH with the test strips: If it is higher than 2, add more citric acid.
2) While the pickle is cooling, prep the hide by tacking it fur side down and spread open on a sheet of plywood set on sawhorses. It takes about 20 nails to do the job. Be sure to tack the tail open. With a pressure washer of at least 2,200 psi and a fan nozzle in the wand, blow the fat and membranes off the inside of the skin. Start at the nose and work toward the tail, moving the wand constantly to prevent it from cutting through the hide.
3) Untack the hide from the plywood. Use a small pair of scissors to trim any meat and fat from around the nose, eyes and ears.
4) Wash the hide with generous amounts of dish-washing liquid and water to remove any dirt, blood and debris. Apply soap to both sides of the hide, work it in and then rinse thoroughly under running water to remove all soap.
5) Hold the hide by the nose and squeeze out as much water as possible with the other hand, moving downward.
6) Move the pickle into a plastic bucket. Spread the hide to make sure it isn’t stuck together anywhere, and add it to the pickle. Check the pH the next day to be sure it is lower than 2. The pickle must be kept above 55 degrees.
7) The hide may be removed at 48 hours (72 hours for deer, otters and other thick-skinned animals). Wash it thoroughly with water, and put it in a neutralizing solution made up of 1 tablespoon of baking soda per gallon of water. Allow the hide to soak for 10 minutes.
8) Remove the hide from the solution, wash it again and knead the water from it. Spread the hide on a working surface, hair side down. Use scissors to open the front leg holes so the hide will lie flat. Dab off any excess water with a rag. Drizzle Deer Hunter’s & Trapper’s Formula over the hide, including the tail. Warming the formula in warm water makes it more fluid. Spread it evenly and rub it in with gloved hands.
9) Set the hide aside, fur side down, in a protected environment overnight or until the hide begins to dry. When drying is well-progressed, break the hide to soften it by pulling it across a firm edge, such as a chair back. A chair with a ball on each side of the back rest is preferred.
10) The hide should be broken every day for three or four days. Sanding with coarse sandpaper should be done in conjunction with breaking the hide. Once the hide is softened to the desired degree, the tanning process is over.
11) The hide may be trimmed to make it more symmetrical. Comb the fur against the grain with a coarse fur grooming comb (available online) to fluff the hair up. A fine grooming comb may then be used to dress the fur.
Click here to learn how to skin a coon.