Most outdoorsmen spend too little time taking pictures of their fish and game. Here are some easy tips that will greatly improve the shots you take in the outdoors.
“Uncle Johnny, you didn’t wrestle a bear,” my nephew Ryan McLellan said in a hunting camp a few years ago when I told him the story of the night I wrestled a 450-pound Canadian black bear and pinned him to the mat until the count of 10. “That’s a lie, or at best, it’s one of your tall tales.”I narrowed my eyes and frowned at my nephew’s lack of trust.
“Now Ryan, I did wrestle the bear, I won and I have the photos and the story to prove it,” I explained.
Still, my nephew didn’t believe I’d wrestled a bear, and neither do most of the people I tell. However, when I show the pictures of me in my youth and the gigantic bear and relate the story that documents the event, not only can I win any bet, but I can prove my credibility when I tell outdoor tales to my friends and family.
I’ve often had to dig into my photo file to prove the validity of my outdoor stories. On other occasions, when I’ve explained that I’ve jumped out of an airplane without a parachute, fallen thousands of feet and walked off, I’ve definitely raised some eyebrows.
Even when I’ve explained the tandem-jumping system and that my instructor did have a parachute and I’d attached myself to his harness, I’ll still hear, “You’ve never jumped out of an airplane!” But once again, when I pull out the pictures and allow them to read the article, I can document the reliability of the stories I tell.
How many times have you taken a big buck or caught a trophy fish and have your buddies roll their eyes in disbelief at your story? Regardless of how much you try to convince them that you’ve actually done what you’ve said, you know they don’t believe you.
But if you can show them pictures, you’ll quickly hush the mouths of the disbelievers.
You can use and enjoy outdoor photos as more than keepsakes to remember the good times you’ve had afield in the past. Photos of your outdoor adventures prove your story to friends and family members and to the elderly men and women in those rocking chairs on the front porch of the old-folks home, once you arrive there, that you’ve had an exciting life. In my opinion, the photos you take of any outdoor adventure become the true trophies once the meat’s eaten.
I’ve taken literally hundreds of thousands of photos in my years as an outdoor journalist, and along the way I’ve even learned a thing or two about capturing images to make them memorable for a lifetime.
Here are some of my suggestions:
• The No. 1 rule is to get close. Most people when shooting hunting and fishing photography stand too far away from the outdoorsmen they want to photograph.
So when you start to take a picture, take two steps forward. Then look through your viewfinder, and make sure you have the top of the person’s head and most of the animal in the viewfinder before you snap the picture.
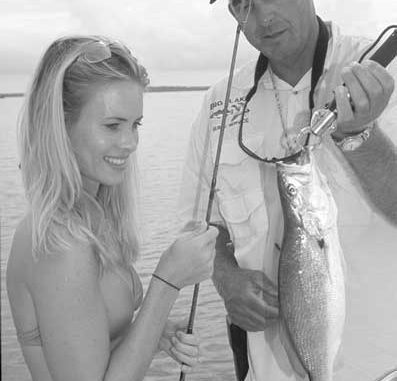
For instance, when you photograph fish, you want to see the person’s face who caught the fish and the fish in the photo. You don’t need the person’s feet, the boat or the rods and reels on the boat. Get close to your subject, fill up the viewfinder with the main subject, and then push the button on the camera.
If you’re photographing a hunter who’s just taken a deer, you don’t need to see from his shoulders back. You really want to see the hunter’s head and the buck’s antlers. If the hunter holds the head at the base of the antlers and points the deer’s nose right at the camera, you can’t see what the tines look like.
Instead, have the hunter turn the deer’s head slightly to the left or the right to show off the longest or the most-interesting antlers.
• Always clean all the blood off the deer’s nose and mouth, and put the buck’s tongue back in his mouth before you take his picture. Taking a minute to clean up an animal makes the photo much more pleasing and interesting.
• Turn the camera sideways. Most people take pictures horizontally, but they photograph people standing vertically. Also, when you move in close, holding the camera vertical will allow you to get more of the person and the trophy animal in the picture than if you shoot horizontally.
Just for fun, turn your camera sideways, shoot vertical photos, and look at the difference in the pictures you get back.
• Lay down, climb up or get in the water. You’ll take some of the most-boring pictures ever when you photograph while you’re standing up. If you’ll kneel down, lay down or get above your subject and shoot the same picture from a different angle, your photos will become more interesting, and people will enjoy looking at them more. If you’ll notice, in magazines, often someone not in the same boat as the person who’s caught the fish takes the most exciting fishing shots.
For dramatic fishing shots, get in the water, and shoot from water level at the person and the fish. This technique works for inshore fish like speckled trout, redfish and flounder, where often you can find shallow water.
Although offshore fishing in deeper water for snapper, grouper, king mackerel and marlin makes this method more difficult, fish with a buddy in two different boats to shoot that boat-to-boat photography.
Most books on shooting photography and most people who teach photography emphasize for you to keep your cameras and film away from and out of the water. I agree. If you get water in your camera, it more than likely will die. However, you can get into the water, shoot the photos, keep your camera dry and take great photos.
• Carry a shirt bag. Anglers often wear white or drab colors when they fish. When you flip through a magazine or newspaper, if you see a splash of bright color, like reds, yellows or oranges, your eyes immediately go to that color, regardless of the picture’s subject. Bright colors attract our eyes.
Always carry bright-colored clothing with you when you shoot pictures, even family pictures. Have the people you want to photograph wear that bright-colored clothing in all pictures.
Even when you shoot hunting photography, get the hunter to wear a bright-orange hat or an orange vest for more-pleasing and much-more-interesting photos. Always assume that the people you plan to photograph won’t have on bright clothing.
• Watch the bills of baseball caps, and shoot fill-flash. Fishermen and hunters do have eyes and noses. However, most outdoorsmen you photograph will have big black spots created by the shadows of their baseball caps where they should have eyes and noses.
To solve this problem, have your subject push the bill of his cap back.
Also, to see eyes and noses in your fishing and hunting photography, lay down or kneel down below your subject, and shoot fill-flash. I always shoot fill-flash during the daytime when I shoot outdoors to ensure my subject has eyes and a nose, and has enough light to stand out from the background.
Have you ever noticed when you get your pictures back that the person holding the fish or animal may appear almost black, while the scenery around them really looks good? The subject of the photo seems to have vanished.
When a camera reads the light behind the subject, which often is brighter than the light on the subject, the camera sets itself to the proper exposure for all the elements around the subject and not for the proper exposure on the subject.
However, don’t worry about all that technical talk. If you’ll shoot fill-flash every time you take a picture, even on bright sunny days, your subject rarely will vanish.
If you don’t know how to shoot fill-flash with the camera you have, read the manual or take your camera to a photo shop and ask the sales clerk to show you how to operate it.
• Photograph plenty of stuff. Many times the most-interesting pictures that tell the story will include the people who have gone on the trip with you, the hunting camp, the boat, the food you’ve eaten, the funny things that happened on the trip, the young people and the old folks there, the smallest fish caught and the person who has caught it as well as the biggest fish.
Take photos of various aspects of your hunting and fishing trips other than focusing on the trophies.
• Learn from the Japanese. If you see a Japanese group on vacation, they’re constantly handing their cameras to someone and asking him to take a picture of their group at a scenic spot or a historical monument, with something they’ve bought or with someone they know. You need pictures of yourself.
Learning Photography
I’ve found digital cameras that allow you to see the photograph and either keep it or eliminate it are one of the easiest and fastest teaching aids for learning how to shoot better photos.
If you shoot a picture with a digital camera and see you’re too far away, you can delete that picture, move in closer and take another picture.
If you see that your subject doesn’t have eyes or a nose, you can eliminate that picture, pop up the flash and re-shoot the photo.
You can get rid of all your bad pictures before you print them, and you can re-shoot the pictures on the spot when you know the picture doesn’t illustrate what you want it to show. Also, you can show a picture you’ve taken to a friend who may know more about shooting photography than you do, and ask him or her how to take a better picture. He can teach you on the spot what to do.
Even if you don’t have a digital camera, when you get your prints back, take them to a photo shop. Show the employees of the shop your pictures, and ask them what you need to do to get a better picture.
Most photo-shop employees will share their knowledge of photography with you. The better they teach you, the more film, processing and camera gear you’ll buy from them.
By asking questions, you’ll learn more with each roll you shoot, and your photos will continue to improve.
Video Photography
Have you ever noticed that the hunting and fishing shows on television don’t shake and vibrate nearly as much as your home videos do? What do they do that you don’t? How can you make your home videos of your hunting and fishing trips better? All commercial videos:
• have photographers who shoot their videos from either tripods or tree pods. You can’t hold your camera still enough to make a video that doesn’t have wiggle in it without these aids.
If you plan to spend the time and money to shoot a video, buy a tripod or a tree pod to shoot higher-quality video footage.
• tell a story, starting with where the action takes place, identifying who’s there and what fish or game they plan to take and telling how they’ll hunt or fish.
• show scenic shots of sportsmen hunting or fishing. They show the strike and the angler reeling in the catch, or they’ll show the animal’s relationship to the hunter, the hunter just before he takes the shot, the animal when he takes the shot, or both the animal and the hunter in the same frame when he takes the shot.
They show the angler boating the fish or the hunter recovering the game and the sportsman with his trophy. They get him to describe how he’s taken the trophy and give the pertinent information of the person they’re hunting or fishing with and the place where they’ve shot the video.
Then the viewer can contact a person where the outdoor activity has taken place. If you’ll follow this outline, you can shoot interesting and exciting videos to share with your friends and family too.