Through much effort, conservationists have constructed a quail wonderland on Jackson-Bienville WMA.
I’ve heard everyone from fishing guides to marine electronics salesmen talk about what sonar can and can’t see in the underwater world, and the ratio of good information to bad has been about 50-50. I can usually separate the wheat from the chaff, thanks to more than 30 years of interviewing engineers and genuine sonar experts, and I have picked up a few basic truths worth passing on.
Pingology
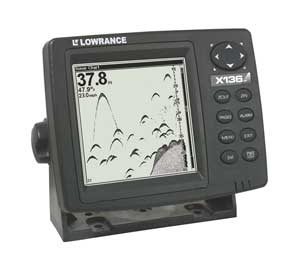
Sonar works by transmitting a sound pulse through the water. The sound hits certain objects that cause some of it to bounce back to the transducer as echoes. A sonar unit can calculate how far each of these things is from its transducer by measuring the time it takes for the sound to reach them and return.
All we need to identify what sonar can and cannot see is to determine what returns echoes and what does not.
Anything that is different in density from water can reflect an echo, and the greater that difference in density the stronger the echo. An object can be either more or less dense than water; it’s only the difference in density that matters.
In theory, a steel ball bearing and an air bubble could produce identical marks on a fish finder’s screen.
The echoes we want to see most are made by fish, and there is some confusion as to how they happen. The most popular theory is that the air bladder in a fish causes its echo. The air bladder certainly contributes to the fish mark on your screen, but fish that don’t have air bladders can also be seen by sonar.
Like people, fish are made mostly of water, and there isn’t much difference in density there.
Fish components like scales, gill plates and skeletal structure are more dense than water, and while air bladders may be the most prominent echo-producing parts in most fish, these other components also contribute.
Size matters
The secret to accurately estimating fish size with sonar is to use consistent sensitivity and depth-range settings. Generally speaking, larger fish generate stronger echoes that make thicker marks on your screen.
The stronger an echo, the thicker its mark from top to bottom on the screen. A baitfish might be one pixel thick near the center of its arch-shaped mark, whereas a 2-pound fish might be three or four pixels thick. The length of a fish arch from side to side has nothing to do with fish size; it just tells you how long the fish remained inside the transducer’s beam.
A consistent sensitivity setting is critical because you can make a 1-pound fish look like a 10-pounder just by turning up the sensitivity. Conversely, you can turn the sensitivity down far enough to make a 10-pounder look like a baitfish.
Switching the depth range from 0-30 feet to 0-60 feet reduces the size of fish marks about 50 percent while switching from 0-60 down to 0-30 makes them twice as large.
So, manually select a depth range setting that shows the lake bottom near the bottom of the screen at the deepest depth you intend to fish. Then, set the sensitivity by turning it up until you see dots of random interference all over the screen and turning it back down until the dots just disappear.
Note the sensitivity setting and try to duplicate it each time you use that same depth-range setting.
The fringe factor
The location of a fish in the transducer’s beam also affects its indicated size. Sound is strongest in the center of the beam, and it gets progressively weaker toward the outer edges. Move that 10-pound fish from the center of the beam out to the edge (while staying at the same depth), and the weaker sound out there will result in a smaller mark on the screen. The message here is don’t assume there are no big fish around just because you only see a couple of smaller fish marks on the screen. Keep fishing.