Redfish Bay lives up to its name during the springtime.
As a young dad, I wanted to take my boys deer hunting, but they were still small for high-powered rifles, and the budget didn’t allow for two new rifles anyway. Then a fellow traded in a smaller single-barrel, open-hammer 20-gauge FIE shotgun at Rich’s Coins and Guns in Baton Rouge, and Bob Rich called me.
This little gun had been bought by the gentleman for his wife, and he had the stock cut down professionally. It was perfect! Price, size, gauge all came together, and I bought it. The only question was would it work with buckshot.
The yellow 20-gauge shells carry 24 pellets of No. 4 buck. I drew a 30-inch circle on a piece of cardboard, hung it on a tree limb, stepped off 40 yards, and fired the little crack barrel at the center of the circle.
To my surprise and delight, the gun loved the buckshot. Its full choke would throw an incredibly even spread of shot across the circle, and invariably place 14 to 16 of the pellets inside of it, centered perfectly. We were ready!
Both of my boys killed their first deer with one shot at about 40 yards from stands that year. Both were young does, both traveled only a few yards before dropping within seconds of the shot.
Ten years later, my daughter killed her first doves with that same gun. It threw great patterns with birdshot, too. Not a bad investment for a $60 price tag on a used gun.
The little scattergun has long resided at the house of a friend with a number of kids, each of whom has been trained with it on their way to adult-sized guns.
But one reason it turned out to be such a good buy was that it performed — with both buckshot and birdshot. And that is something all too few shotgun owners ever take the time to test.
Go ahead. Admit it. You’ve spent hours in years past lining the sights up on your deer rifle, hunkered down over sandbags at the range, finding out just where Ol’ Betsy printed her loads. And the shotgun? Well, you’ve never really considered it, have you?
That’s exactly what I thought. And if you took the small amount of time to do it, you might discover some interesting things about your shotgun. Like that choke you added actually blows holes all through the pattern at 40 yards — holes a dove can sail right through.
Or you might find, as I did, that the choke you trusted so much throws a nice, even pattern, only not exactly where you expected it to go.
Talking turkey
When this column hits the newsstands in late March, spring turkey season will have started, and there will be approximately a month left for gobbler chasers to pursue their sport.
While never much of a turkey hunter, I’ve taken a number of gobblers over the years, enough to develop some reasonable tips to hand out to those insatiable persons that seem to live for the spring and turkey season — a pursuit I’ve often considered excessive for something like a bird.
But I’m not one to criticize. I fully understand the affliction of the need to pursue wild game. I’ve just never been able to totally hook myself into abusing my body to take something as ugly as a wild turkey. I know, I know. It’s the challenge, right?
There, I’ve said it. Don’t curse — my opinion is just that, and you are certainly entitled to your own obsessive behavior. I’m just going to point out a few tips I picked up while discovering I didn’t like getting up an hour earlier than I ever thought about getting up to hunt a deer, to chase a ball of feathers with scaly legs.
While listening to a turkey expert on a hunting show years ago, I heard the interviewer ask this noted caller what size shot he used. He stated every time he shot a turkey with No. 4 shot, the turkey went down like it was pole-axed. Every time he shot one with No. 6 shot, it flopped and ran around for a while, giving rise to the fear it was not effectively shot, and might run off.
A revelation occurred at that moment. I realized that had been my exact same experience with the several gobblers I had taken. From that point on, when I hunted turkeys, I used a 12 gauge with maximum loads and No. 4 shot. Worked like a charm every time. At reasonable ranges, they dropped in their tracks most adamantly.
Since the head of a turkey is a small target, and the one thing you want is as much shot hitting it as possible, I always patterned my turkey gun.
This year, while not really planning on going after a gobbler, I thought a demonstration on just how easy it is to do this would be the basis for a good column — and the perfect opportunity to see just what sort of job those screw-in chokes would do since Reynerson’s Gunsmith Service installed them several years ago.
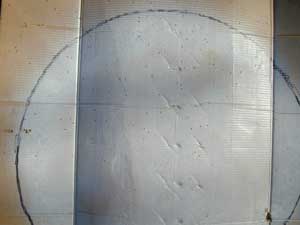
I found a large cardboard box that hadn’t yet made its way to the trash pile, opened it up and with a piece of string measured out to 15 inches. I scribed a 30-inch circle on the box at chest height with a black marker pen.
I then stood the box up against a tree limb in the backyard of my rural home, measured an exact 40 yards, and fired a load of No. 4 shot at the center of the circle from my old Remington 1100 with the full-choke tube screwed in.
Total elapsed time from beginning the drawing on the cardboard to firing the shot was less than 20 minutes. Compare that to setting up to test a rifle, by the time you assemble all the gear and accessories and get them to the range.
And was I in for a surprise. Such a revelation that I made several more test shots with different shot sizes.
While the choke tube throws a very even pattern, the barrel distributes it high on the target — the densest portion of the pattern occurs in the upper half of the circle, with half of the pattern landing above the circle. In other words, the center of the pattern hits about 18 inches above point of aim at 40 yards.
This pattern repeated itself with several different shot sizes. If I were to hunt turkey with that gun and choke screwed into it in that manner, I would have to aim at the breast height of the turkey to ensure the heaviest cloud of shot hit the turkey where he needed to be hit the most — in the head!
Pretty good information to have if I were going hunting turkey with that gun, wouldn’t you say? And I had all that information within an hour. A relatively easy test to perform, and one all too few shotgunners will ever take the time to accomplish.
Patterning a shotgun is a fascinating lesson in physics and physical functions. It will tell you not only what sort of shot your gun likes best, but how you hold and control your gun, and how to improve your stance, grip and aim.
Perhaps the hardest part of the entire process is simply finding large enough pieces of paper. Once you have located that, you need to make a number of targets — you use them rapidly, and the testing becomes sort of an addiction in its own right.
The industry standard, as mentioned above, is a 30-inch circle at 40 yards. You can test each of your chokes with different shot sizes to determine how your choke patterns. After drawing your target, and measuring your distance, making sure you have a clear area downrange, throw the shotgun to your shoulder and shoot rapidly, pointing the gun at the center of the circle. This will give you a fair approximation of how the choke patterns. Five shots is generally considered enough to average the spread, and compensate for flinching, poor shots, etc.
For those of you of a more technical bent, here’s the way the NRA technical staff does it. Now it’s going to become much more tedious, but you will have an exacting knowledge of just what your barrel does with the shot you use.
These instructions come from the NRA Firearms Fact Book, a small blue pocketbook no longer in print that answers practically any question you can dream up about the shooting sports. It’s an absolutely invaluable resource for a shooter, and it’s a shame the NRA no longer publishes it. It is still available on the used book market.
Set up a piece of 48-inch square kraft paper in a manner to allow the shot to pass freely through it. Using a can of black spray paint, squirt an aiming point in the center that is large enough to be seen easily at 40 yards (25 yards for .410 or skeet guns).
Step off 40 yards and fire, preferably offhand without a conscious aim.
To evaluate the pattern, draw a 30-inch circle that encloses the largest concentration of pellets. It may be necessary to draw the circle slightly off the sheet.
Next, draw a circle 2l.21inches concentric with the larger circle. Then quarter the two circles with a straightedge — this divides the circle into eight equal areas.
Count each area, and mark the total. Then add the totals for the inside four sections and the outer four. The total number of hits in the 30-inch circle is totaled next. The NRA technical staff then says to choose five shotshells from the lot being tested, and count the number of pellets in each. Average the five totals.
Then divide the average by the number of hits in the 30-inch circle for the barrel’s pattern percentage. The operation can be repeated for the 21.21-inch circle and the 30-inch ring formed by the four outer sections.
The gun’s impact point is located by measuring the distance from the intersection of the quartering lines from the center of the aiming point. A properly regulated shotgun will place its pattern evenly around the aiming point. Consistent patterning away from the aiming point should be corrected by bending the barrel or installation of an eccentric choke tube.
Or in my case, I’d trade the barrel away for another one. Or get another gun.
When I hunted deer off horseback, I acquired a Model 1100 Remington in 3-inch magnum 12 gauge. This was the standby for horseback hunters because of the increased number of 00 pellets the shell carried.
The problem was, I couldn’t kill a deer with it. After taking a considerable amount of heat over all the misses I was making off the back of my horse, I hung up a piece of paper, and patterned the gun. It threw a nice even pattern that centered about 2 feet above point of aim at 40 yards!
I quickly traded the barrel in on another one, taking a beating on price. The new barrel patterned perfectly around point-of-aim, I started taking deer again, and the harassment stopped — at least on that subject.
In that case, it wasn’t necessary to conduct the NRA method. I have partially performed this series of tests, and I can attest it is tedious and time-consuming. It will also give you a wealth of information about your barrel, its pattern and point of aim — if you are so inclined.
For the rest of us, I like my method; it’s simple, quick and instills a confidence in my aiming resulting in better shots, and more game. And isn’t that what it’s supposed to be all about anyway?
If I want it changed, I can take it to a competent gunsmith, and have him adjust the barrel — or better yet, just change barrels or chokes, and test it again-much like I did with the deer barrel.
I will assure you of one thing. Next dove season, I will throw up a sheet of paper, and make my cursory test of the new modified choke tube. I will never forget the poly choke I had on this 12 gauge that threw misshaped patterns in every shot and setting — patterns with holes in them big enough for crows to fly through. I had that obscene piece of metal cut from the end of the barrel, and screw-in choke tubes installed. And they work a heck of a lot better, and my confidence has improved immeasurably in my shooting skills with that gun.
Gordon Hutchinson’s best-selling novel, The Quest and the Quarry, a generational tale that parallels the lives of a line of trophy bucks with the youths of a farming family, can be ordered at: thequestandthequarry.com, or by calling (800) 538-4355.