If you keep seeing ducks fall into a pothole that is hard to get to without spooking the birds, you need to try this hunter’s approach and prep a kayak for stealth.
The hunt didn’t last long. Good hunts never do.
The ducks never had a chance.
Just before daylight, Lafayette dentist Tony Soileau slipped his camouflaged kayak across the pond’s open water and maneuvered it into an island of flooded buttonwood bushes surrounded by a fringe of dry, brown indigo.
There, Soileau backed the tiny craft under the leafless limbs of the bushes to provide some overhead cover. The indigo screened the outline of the kayak — a perfect setup.
“It won’t be long now,” he whispered in anticipation. “Fifteen minutes after they start shooting in the rice fields, they’ll be coming into my pond.”
The hunter alternately hacked on his teal call and squealed his wood duck whistle.
“C’mon, c’mon,” Soileau cajoled the overhead birds under his breath.
They obliged.
“What a slick job,” I thought to myself, thinking of all those wary late-season quackers that avoid anything looking like a blind. You know: Those that stack up in small out-of-the-way places too difficult to get a larger boat in.
I resolved to ask Soileau how he built his ghillie kayak. Fortunately, he turned out to be as willing to cooperate as the ducks he suckered in earlier in the day.
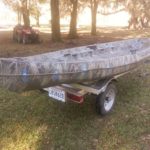
“Without modifications, the kayak stuck out because of its uniform color and hard outlines,” he said. “My goal was to make it into a sort of floating blind that is easy to move around.”
Soileau’s choice of kayaks was a 12-foot NuCanoe. It can seat two people or one person and three dozen decoys, he explained.
A 10-foot model can only accommodate one hunter and a dozen decoys. NuCanoe also makes a 13½-foot version, but Soileau said it is narrower and more designed for fishing than for hunting.
Soileau walked me through how to build a duck kayak.
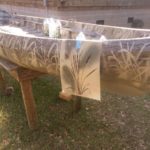
The first step is to paint the boat. Soileau used six colors of Rust-Oleum camouflage spray paint purchased at a local hardware store and Mossy Oak paint stencils purchased online.
No base paint layer is necessary, Soileau said, as a NuCanoe comes with a rough green surface to start, but he cautioned that the kayak should be thoroughly washed and dried with a towel before beginning to paint.
Masking tape should be applied to protect anything not to be painted, such as the kayak’s carrying handles.
Begin painting stencils with dark colors first. Paint should be allowed to dry at least an hour before another coat is applied. When a stencil becomes very wet, simply lay it aside and switch to another one.
Masking tape is useful for holding stencils against the curved portions of the hull, as well as for making tabs that allow wet stencils to be easily picked up from flat surfaces.
“Be fearless and committed,” Soileau said. “It won’t look good at first, only shaping up after a couple of stencils. If you mess up, don’t worry — paint over the mistakes and start over.”
The finished paint job should show multiple layers of colors. The kayak should be allowed to dry for a week before any use.
After the hull is painted, the bases of the NuCanoe’s swivel seats and any desired attachments such as gun mounts, should be painted in the same manner as the hull and set aside to dry.
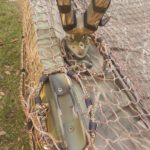
Items needed to construct the ghillie include 30 feet of 3/8-inch diameter drab-colored paracord (available at big box home improvement stores), enough 1½-inch ghillie suit webbing (available online) to cover the kayak and hang down its sides, five bundles of ghilli net yarn in five different colors (Soileau used all five bundles, so an extra bundle in a favorite color might be useful), 150 one-wrap 8-inch Velcro thin-ties cut into thirds, three cable ties and masking tape.
Soileau cautioned that fishing net webbing should not be used instead of ghillie webbing because it has no stretch.
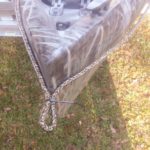
Run a single piece of paracord from the stern of the boat along one side, around the bow and down the length of the other side back to the stern.
Using pieces of masking tape, the paracord should be taped in place no lower than 4 inches above the waterline. Any lower placement will allow the ghillie to snag on vegetation.
The two free ends of the paracord at the stern should be overlapped and tightly secured to each other with a couple of cable ties.
A small loop in the paracord should be made with a cable tie at the bow of the boat. The loop makes it easy to identify the bow end of the ghillie suit when placing it on boat. It also comes in handy to hang the suit to wash it and let it dry.
Lay the ghillie net over the kayak. The edges of the net must extend beyond the paracord in all places, as the paracord serves as the hem of the finished ghillie.
Place a number of wooden blocks, old bricks or other weights on top of the webbing in low places in the boat. This makes the webbing lie in the form of the boat.
Secure the webbing every 6 to 8 inches to the paracord with Velcro strips, removing the masking tape as you go. When finished, step back and check the fit on the boat; if it is OK, trim and discard the excess webbing below paracord.
Holes must be made in the ghillie for what Soileau calls “entangling attachments.” These include gun mounts, paddle holder and any cleats desired.
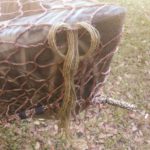
After the attachments are added to the hull, holes are made by Velcroing a knotted piece of paracord to the webbing around the attachment.
The webbing inside the paracord loop must be cut out and discarded. In addition to reducing entanglements, the attachments in the holes serve as anchor points to hold the ghillie in position.
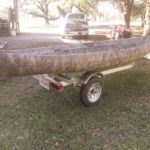
The final step is attaching the ghillie net yarn to the webbing. This is done by knotting six to eight strands of ghillie net yarn with an overhand knot through a mesh of the webbing and pulling the knot tight. How far to space the net yarn knots apart from each other is a matter of judgment.
Soileau said the objective is to break up the form of the boat, not completely obscure it.
But it’s important to note that if too much net yarn is used, it gets too heavy when it is wet. The yarn on the lower part of the webbing should be knotted to hang 4 to 6 inches into the water.
The yarn luffing in the water breaks up the straight edge of the hull-water interface.
Soileau noted there are two choices of net yarn: natural or synthetic. The latter holds its color longer, is lighter when wet and easier to dry. Natural yarn is easier to tie and doesn’t tangle as easily.
Soileau’s preference is synthetic yarn.
Colors should be mixed to match the predominant natural colors in the area the hunter plans to hunt. Soileau stressed that a lot of white occurs naturally in the environment, and that white yarn quickly becomes gray after use.
Shotgun mounts are important to Soileau and deserve a note of attention. He wants his gun secured as he moves through flooded timber and buttonwood thickets. One small twig can quickly pull a shotgun overboard.
The bases of his mounts are YakAttack MightyMounts, used because they have a metal backing plate that goes under the kayak’s plastic skin. This offers a more-secure mount than simply screwing into the plastic.
The cradles in which the shotgun sits are Sure Grip Gun Racks. Each rack is attached to a mount with a YakAttack HD Track Mount (with the ball removed). A couple of holes will have to be drilled to adapt the gun rack to the track mount.
YakAttack products can be purchased at any kayak specialty store, while the gun racks can be ordered online.
Soileau noted that it is easy to replace the gun mounts with rod holders after hunting season.


